Using a soldering iron, wax is applied to a metal finger of the required diameter for the ring. The finger is wrapped in foil for easier removal of the wax in the future.
Chisels are used for wax carving; Timofey’s are homemade. Wide and flat for removing large amounts of material and creating shapes, a needle for fine work and engraving, and a tubular spoon cutter for general work and wax fusing, which will be shown later.
When the drawing and letters are marked, the lines are gradually deepened and unnecessary fragments are removed from the background. And after an unknown amount of time, the model becomes similar to what you could see on the finger of the author of the channel AlexGyver. Then the iron finger is removed, as is the foil. Next comes the optional procedure of taking a cast from the model. The cast allows you to quickly make waxes and replicate the model, for example, for fans. But at the same time, even when making a single product, one wax gives one casting mold, and in order not to screw it up, you can also make a cast just in case, it will be saved in the game or program.
The model is filled with liquid rubber, for example, PentElast-718, which acts as an epoxy and vulcanizes when a catalyst is added. The mold for creating the impression is made of plasticine. To improve the transfer of small details, the wax is also carefully coated with rubber and then immersed in the mold. After curing, the cast is cleaned and everything is taken apart, the cast is cut.
From a bowl of melted wax, wax is spread onto the sprues to seal them together. This is necessary to ensure proper flow and crystallization of the steamed metal. Next comes the process of shaping (or molding). The resulting casting tree must be washed from dirt and grease and secured in a steel pipe, where it will be filled with refractory gypsum. The tube is a frame, it is called a flask. Models are washed in hawthorn tincture, soap, and then in clean water. Using masking tape, the walls of the pipe are lifted. Gypsum is diluted according to the instructions.
It is not enough to just pour it, you need to completely remove all the bubbles from it, otherwise the molten metal will fill them and then the product will be covered with a bunch of small balls, which will not be possible to remove everywhere and the design on the model will be spoiled.
The pump pumps out air from under the hood, and the tabletop vibrates from a motor with an eccentric. This way all the bubbles are knocked out and blown out of the plaster. Gypsum is mixed over time because the process is strictly limited. Plaster is not just dirt that will dry out. When kneading, it is liquid and flows like kefir, but after 8-10 minutes it hardens, as a chemical reaction occurs in it. If you stir it further in this state, then it will remain porridge forever.
In a vacuum, the plaster boils and air comes out. First, the batch itself is evacuated, then it is poured into the molds and evacuated again. All this needs to be done in 8 minutes. In the flasks, the plaster boils again and rises, and that’s what the tape is for. The flask is filled to the top and the plaster may begin to flow out. An hour or two after molding, the gypsum is already hard and can be processed mechanically.
The flasks are unsealed, the tape is removed, the supply with plasticine is removed and the wire is pulled out. This opens the sprues leading to the model. The waxes have already fulfilled their purpose, transferring their shape to the plaster. That's it, there is no going back, the wax model has turned into a wax puddle, now you need to remove the water from the molds, there is almost a third of it by weight.
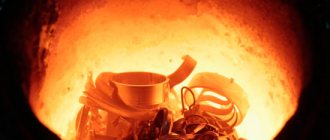
The molds are now super damp, they need to not only be dried, but calcined so that all the water comes out of the crystal lattice of the plaster. To do this, the furnace must gradually gradually raise the temperature to 730-750 degrees and then lower it slightly lower before casting. This is done by the thermal controller. Calcination under the supervision of a thermal controller takes 9 hours.
Casting will be done under pressure from the force of inertia, and the mold is fixed in a special high-tech device. Any silver scrap is used as metal and melted with a regular burner.
Ordinary boric acid (sold in a pharmacy) is added to the hot metal. It becomes an oil film that covers the metal and protects it from oxidation, absorbs slag and cleans the melt, in general, performs the same functions as during conventional soldering. Boric acid, by the way, gives a green flame.
Next, for reliability, there is a second flux - this is sodium tetraborate (aka borax), it does everything that a regular flux should do. The melting metal is mixed with a titanium knitting needle. By the way, the metal does not pour into the gates on its own, because the force of surface tension that rolls it into a mercury ball prevents it from spilling into the thin corridor of the casting system. For this purpose, they are made thin so that the metal can be melted and prepared and only after that the entire mass can be poured in at once.
Next comes the injection molding process, in which the force of inertia forces the metal into the mold. As crazy as it may seem, this method is actually practiced to this day, although more often craftsmen prefer to use more stationary carousel installations. For example, dental crowns are poured into these and everyone is happy. The metal crystallizes under pressure - this gives it better characteristics. Next, the casting is removed and cleaned of plaster.
Let's move on to processing the casting. After biting or sawing off the sprues, the casting must be fired red-hot to relieve stress in the metal and remove mold deposits. After heating, the casting is dipped into a solution of ordinary food grade citric acid from the grocery store and the whole thing is boiled with a burner. When citric acid boils, it acts like a real acid - it corrodes and washes away excess from the metal, and the silver turns white.
This is followed by polishing to give the surface a shine, and then blackening or oxidation, a process of artificial aging in a solution of sulfur liver.
A pinch of powder is melted until it flares up, then poured with water and brought to a boil. In the resulting solution, silver turns black in a matter of seconds.
Wax modeling (wax carving)
"Prequel" for my post about jewelry casting
Last time I was repeatedly asked to tell you how work is done on a wax model, which is then turned into a metal casting.
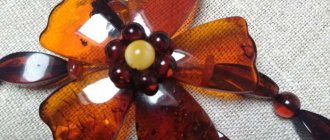
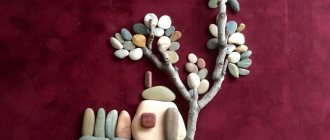
The essence is to make a three-dimensional model (wax) of the future jewelry in natural size with all thicknesses, textures, drawings and inscriptions. The casting process produces a metal casting that accurately replicates the wax down to the last scratch. Modern jewelry wax, of course, has little in common with beeswax; it is a chemical composite that has great strength and is more like plastic, but it melts at a temperature of 70-100 degrees, which is necessary for the technology. This also allows you not only to cut off the excess from it with a chisel, as in wood carving, but also to melt new mass, correcting defects and literally growing the model, which makes it an ideal material for sculpting small detailed forms. Wax modeling has become the most amazing and interesting craft in my life!
Jewelers distinguish between modeling wax and foundry wax (pictured on the left and right, respectively). The first (known as Ferris) is hard like wood or plastic, planed into dry small chips, sawn, drilled with cutters and polished, but even with a thickness of less than a millimeter it remains durable. I rarely use it for the smallest thin carvings, it requires more tools, more time and in general it is not a beginner’s choice. I like the foundry one (although it is intended for pouring into a rubber mold for replicating waxes) better for carving. It allows you to work faster and, I would say, more aggressively with the sculptural form - trim off the excess from a soft piece, fuse a new one, quickly edit it. You can buy both in jewelry stores like Ruta or Sapphire, but most likely in large quantities, more than a beginner could cut up over the years. I personally haven’t been able to try to weld something similar for carving on my own, although you can get something close if you want. You can ask any jeweler in your city where there is a small store where you can buy the material in small quantities. usually there are always some small shops.
To work with foundry wax, you do not need to use a drill and files; all you need is a set of three or four cutters, a simple soldering iron and a couple of additional little things, which will be discussed later. No purchased tools like wood chisels or dental picks will work here. Although you can independently grind more suitable cutters from the latter, their steel base is quite heavy for comfortable work with a weightless model. I prefer light cutters on a wooden stick or, in extreme cases, sharpened old needle files. The main essence is one cutter with a wide rounded blade to remove a lot of material and form the overall shape, one thin needle-shaped one for engravings and fine details, and the most important one - a tubular one. similar to a spoon to melt wax in it by pressing it to the soldering iron and fuse drops of wax to the model. Plus, it also cuts, so up to 80% of all work is done with this cutter.
You will also need a suitable steel container for melting wax - wax.
This could be a container for heating wax with a soldering iron - 2 cm deep (the length of the soldering iron tip), 4-5 cm in diameter and secured in some kind of casing so that you can hold it in your hand and melt the wax with a soldering iron without fear of getting burned. A convenient wax is obtained from the bottom of a steel glass, glued into a cut-off tin spray can. You can use a small trough to pick it up with pliers and place it on a heater of some sort. For many years now, my desktop device has been a heater from a bicycle vulcanizer - a 250W rectangular iron that can withstand temperatures in the range of 120-160 degrees with an internal thermostat.
It’s even better to make wax from a soldering iron by hard soldering a metal (preferably copper) wax bowl to the tip and mounting the soldering iron heater on a stand. This “electric spoon” can be taken by hand by the stand to cast wax. All the shavings from the thread are poured into it and melted into a new material. After this, the wax does not change its properties at all; it is absolutely waste-free.
Wax is convenient in that the workpiece for carving does not need to be sawed off from the block; it is enough to melt the part with a soldering iron in the wax wax and pour it onto foil or an aluminum plate - you will get a plate 2-3mm thick and of the required size, from which you can cut out almost any product (for rare exceptions, your own methods)
Medallions and other decorative items can be modeled from a flat blank - three-dimensional elements can always be increased by melting pieces of wax directly with a soldering iron (remember to blow on it so that the smoke does not get into your eyes, it is quite caustic) and only in isolated cases do you have to take a large piece of wax and cut from it. There is no point in talking about the artistic component here; everyone will be able to model exactly as much as they are capable of. Look at photos of jewelry online from other craftsmen, look for something thematic in the search engine images, choose the style you like, draw, read books (Drawing for Jewelers, Wax Modeling for Jewelers and Sculptors) and of course practice. The first models take a long time to come out, it’s difficult and clumsy, but after the 5th-10th-30th the hand gets full.
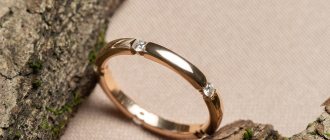
Making rings requires a different approach - creating a blank and all the carving is done on an “iron finger” - a cylinder of the required size. For modeling, the rod can be made of any material - be it a syringe, a lipstick casing, a marker, or even rolled paper. If the rod does not fit well, you can wrap it with paper to the desired diameter. Over the years, I have acquired a set of “iron fingers” of all sizes.
The best way to get a workpiece is to fuse pieces of wax onto an iron finger into one large monolithic influx. Then the excess thickness is cut off, the center line is marked, the top of the signet is marked, and so on. The ring is completely cut without removing it from the iron finger, this is useful for wax so as not to abrade it with your hands. After completing the front side, you can remove the model and work on the back side - here you will notice underfilling of wax when making the workpiece, and also for massive signets, sampling of the pommel is required.
Making a polishing mixture
There are several recipes for polishing mixtures. Everywhere the main ingredient is beeswax. Depending on the proportions of the components taken, the mixture can be liquid, paste or solid. More precisely, the thickness of the mixture depends on the amount of solvent used: the more solvent, the more liquid the mixture turns out.
1). Beeswax. You can buy it in a specialized store, or even better, buy it directly from a beekeeper, it will cost less, and you will definitely get a high-quality product.
2). Turpentine. Typically, turpentine is taken in the same quantities as wax, in a 1:1 ratio.
1. The wax must be crumbled into pieces and melted, either in a water bath or in the microwave.
2. Slowly and carefully begin to pour turpentine into the hot wax, stirring continuously.
3. The finished mixture is poured into a suitable container, for example, a cream jar, and left until completely hardened.
But it is often recommended to replace turpentine with another solvent. Although turpentine is an organic product, it is also a dangerous chemical that can cause eye irritation, skin irritation, and damage to the lungs and central nervous system (if turpentine fumes are inhaled). But this in no way applies to a ready-made turpentine-based polishing mixture; you experience a much greater risk in the process of making the mixture.
Instead of turpentine, you can use other solvents, for example, various vegetable oils. In principle, any will do. Olive oil is especially often used to prepare the polishing mixture. You won't need anything else besides oil and wax. Olive oil based polishing mixture can be used on any type of wood.
1). Beeswax - 2 tablespoons.
2). Olive oil - 6-8 tablespoons.
Chop the wax into small pieces and mix with olive oil. Melt the wax mixed with oil in a water bath or in the microwave. If desired, you can add suitable extracts to the melted wax, but this is at your discretion and is not at all necessary. We also pour the finished mixture into suitable containers and leave to cool.
Polishing mixture with jojoba oil
This oil-safe polishing wax is great for polishing children's wooden furniture and toys that your child might put in their mouth. The mixture is absolutely safe in composition even for the smallest children and does not cause allergies.
1). Beeswax - 50 milligrams.
2). Jojoba oil - 150 milliliters.
3). If desired, you can add extracts and vitamin E.
Ratio: 1 part wax - 3 parts jojoba oil. Melt the wax in a water bath and add oil. Mix everything thoroughly, pour into containers and let cool. The ratio of oil to wax can be changed depending on the consistency of the mixture you plan to obtain.
-The wax-based polishing mixture is ready for use even when it has not yet hardened.
-The olive oil mixture can be stored for 1 year in a closed package in a cool place and out of direct sunlight.
-The mixture with jojoba oil can be stored for up to two years under the same conditions as the product with olive oil.
-Warm mixture is best used for insulating purposes. At the same time, a cooled mixture is better suited for polishing.
-Liquid polishing wax can be applied with a wide brush, but more often it is done with a cloth.
-Polishing wax is able to restore the original color of old wood, eliminates scuffs, and gives new things a darker, deeper and richer color.
Furniture polishing wax made from beeswax is a useful household item. It's worth taking note of the recipe.
Master class on making a master model from casting wax. Part two. Casting
I continue my story about a cat who was born from wax, grew up in bronze, and will reach the pinnacle of her career by becoming a crystal glass