Lost wax casting of brass (WAX filament)
Before casting the stencils, we need to print out these same stencils. I will use WAX plastic from . WAX is essentially wax in the form of a filament. I recommend watching a video on printing with WAX material on ULTi STEEL:
Under one of my videos, a subscriber advised me to try printing wax on foil tape. Hmm, why not? I took a simple aluminum tape. To be honest, I’m not very happy with the result, because a large part, such as a gear, was torn off on one side.
Therefore, I cannot recommend this method, plus there is another huge problem - the aluminum tape leaves traces of glue on the glass.
I also printed out some mounting brackets that I found on the Thingweavers website and some sprues.
This is why I really adore the WAX material, its supports come out perfectly, it’s really super. In one of the following articles we will definitely talk about the possibility of post-processing wax.
For casting I will use the classic method of sand casting with liquid glass. To do this you need to make a flask. The flask is a mold in which the workpiece itself is placed, and the whole thing is placed around the molding mixture. For the flask, I used, since I myself work in a plumbing store, welds of 3 and 4 inches, respectively.
It is necessary to make holes in the flask so that the molding mixture has time to dry. After drilling, the flask looks like this:
But before we pour in the molding sand, we need to glue the sprues to the waxes. I took the classic red casting wax. Then I heat it up with a simple lighter, a few drops fall on the part, and I glue the sprue on top. One drop is enough, in fact, because if you drip a lot, you get a flash around the edges, and this can ruin the appearance of the part, so don’t overdo it - one drop is enough, two is, in principle, too much. At the same time, the melting point of casting wax is much lower than that of the same wax. The wax begins to soften at 90 degrees, so everything is fine. You can safely drip - nothing will happen to the waxes.
I made 3 sprues for the gear, one sprue for the corners, respectively, they are small, I don’t see any point in making any more sprues! But keep in mind that these sprues are not made according to science; they lead directly to the part. I will make a separate article on types of casting. So that you understand what and how. What are the pros, what are the cons, and how to achieve a wonderful result.
Now let's start preparing the molding sand. In my basement I have a whole large, hermetically sealed barrel of sifted river sand. In general, it is better not to use river sand, because it has round grains. There is also quartz sand, it is called quarry sand. This is ideal for making molding sand. Some say that river sand does not make such durable shapes. In fact, if you mix it properly (add liquid glass), I’ll talk about this later, then the shape turns out to be quite strong, basically like a stone. Next, liquid glass is added to the sifted river sand. The proportion is approximately 1:10, the main thing is not to overdo it so that the sand does not become too wet. And mix it. After you have mixed the molding mixture, you need to let it sit for a while, not for long. It needs to be soaked evenly and become moist. Unfortunately, it is impossible to determine specifically whether the molding sand is ready; this is a matter of experience. You need to mix the molding mixture 2,3,4,5,10 times, let it stand, and you, in principle, will begin to understand perfectly well that yes, it is ready. I still don’t know how to explain the phrase, “It molds well”
We put a little molding mixture into the flask, then we put the wax and start pushing sand on top.
Unfortunately, this technology implies that there should be no sprues when the wax is placed in a given molding mixture. Essentially, I seem to be disrupting the technical process, but I don’t want to bother making these tubes from the same molding sand - why? Excessive waste of material. And the flask I chose for this gear was not very successful. The problem is that at the edges of the flask walls there is approximately 5 millimeters left, because of this the sand does not get into the teeth well.
After throwing the molding mixture into the molds, we put them out to dry. I left it to dry for a day in the hot Astrakhan sun.
While it's drying, let's take a look at my purchase.
It was such a new purchase that I probably had it for six months before I got around to working with it. This is a smelter. And not just a smelter, but a jewelry smelter. I took the 2 kilogram model. It costs approximately 20 thousand rubles. And in reality it heats up to 1150 degrees. There is a huge disadvantage - that the crucible in which the molten metal, by the way, here it is,
made of graphite. And during casting, a problem arises that the graphite burns out, and the crucible does not last forever. After a certain number of castings it will become unusable and you will need to buy a new one. Therefore, just for fun at home to work with it, well, honestly, it’s a little expensive, a new crucible of 2 kg. It will cost you 1200-1500 rubles. You just need to find out how many castings it will last for before it breaks. Also included with the smelter were tongs for transferring the crucible with molten metal,
I also used it to carry flasks, it’s actually a very convenient thing. There were also instructions in the box, I highly recommend not to lose them, because there are dimensions of the crucible that you can, or rather will need to buy when the old one burns out. In general, I recommend keeping at least one spare, because it will take about a month or even more to travel, so that you have a spare for work.
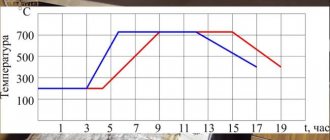
We turn on the smelter and set it to 1150 degrees. I didn’t know that the smelter heats up so slowly; it takes about 40 minutes to reach operating temperature.
Well, the day in the sun has passed. We clean the flasks from excess sand that has stuck to the edges, and also use an iron brush to remove the sand that is poorly stuck together at the top and bottom. Everything has hardened, the molding mixture has become very hard, so we are not afraid to remove the excess with an iron brush. Now we need to melt this very wax, which is inside the flask. To do this, we put the flasks with wax into the oven, turn on the heater to maximum, somewhere up to 200-300 degrees, and heat it up.
Please note that wax from Filamentary is thicker, that is, simple casting wax pours out like water, and very easily, but wax flows out rather slowly, unfortunately.
And again, this is also a very slow process, up to 40-50 minutes. I remember an old video of Dani Craster where he melted PLA plastic, I can’t imagine how long it took him, I guess you can get old like that by accident.
It is recommended to stir the melt using a glass rod. But this is actually quite an expensive pleasure. I recommend using birch wood, thin and long. I honestly don’t know why, I saw it at a foundry. And as you know, the monkey sees, the monkey repeats.
To protect the melt from oxidation I will use boric acid. Don't be confused: borax and boric acid are two different things. Borax is good for aluminum, boric acid is good for casting brass and bronze. In the meantime, our metal is melting, it’s time to light the gas forge.
We place the flasks with the melted wax into the forge. And heat it up until almost white. The molding mixture (if it is mixed correctly) will easily withstand. By the way, don’t forget to protect yourself and wear a face mask and leggings, not gloves, but leggings.
Many of you have little idea what 1100 degrees is. 1100 degrees is so hot that at a distance of half a meter from you, your hands in welding gloves burn.
Pour liquid metal into the flasks.
If you heat the flasks normally, the metal remains in a liquid state for quite a long time.
And so the part was cast.
Next, just let it cool; if you can’t stand it, you can put it in water. The main thing is to make sure that the flask has cooled down sufficiently.
We saw off the sprues: They will then be melted down.
And let's look at the result.
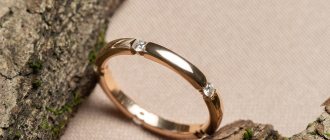
What interests me most is the gear as the most complex part - it was cast simply gorgeous. There are small sagging marks, but they are easily removed. It is easier to remove what is unnecessary than to add what is missing. We saw off the sprues. Next, we remove the remains of the sprues on the grinder, after which we sandblast to remove all the remaining sand from the pores. And this is how the gear turned out. The teeth shed perfectly, it will be necessary to modify it a little and, in principle, we can put it into action. 100 percent there are micro cavities inside the casting, but again, please note that I cast it at home, not on an industrial scale, without using a vacuum, of course there will be pores. But for homemade products, this is simply enough for a thousand and one percent. and also for inexpensive commercial casting the quality is also decent. Let's lathe the gear to make sure there are no cavities inside. I removed about 0.2 mm on the lathe.
As you can see, although there are pores, there are damn few of them. And that's close to the surface. Well? I hope my first full-fledged post will be interesting/useful for you. Good luck in your endeavors! And as they say: “I don’t teach, I just do and that’s it.”
PS Original video if you also like explosions and that’s all:
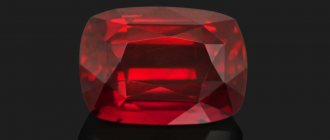
Silver casting
The noble metal silver is one of the oldest metals mastered by mankind. Being in nature in its native form, as well as its low melting point - 962 °C, gave our distant ancestors the opportunity to use this metal in the 4th - 3rd millennium BC.
Silver is a soft, ductile metal, excellent for the production of jewelry, ritual objects, mirrors and for minting coins.
Silver has the best electrical conductivity among metals and is used in the most critical electrical appliances and components. Excellent thermal conductivity makes it possible to use it in heating engineering.
Noble metal was widely used in photography in the 19th and 20th centuries.
Another important property has long been noticed - bactericidal properties. Silver vessels and filters are used to disinfect water. In Christianity and some other religions, the so-called is prepared in silver vessels. “holy water”, which helps with appropriate prayer against all ailments.
How to cast a silver product at home?
Silver is a noble metal, one of the most ancient metals that was mastered by man.
Silver, due to its occurrence in nature in the form of nuggets and its low melting point (962 degrees Celsius), was mastered by man already in the 4th-3rd millennium BC. The most interesting thing is that you can create jewelry from this metal even at home. In this article I will tell you the basic knowledge that will help you create jewelry at home.
You will learn about the process of modeling a product, metal casting, processing and forging, as well as about blackening brass using the example of creating a silver ring and some other products.
Making candles from laundry soap (stearic)
This option uses good old 72% laundry soap. Laundry soap consists mainly of stearin - an organic product obtained from fats, which is also part of wax. The manufacturing technology is in many ways similar to the previous one, but let us briefly describe it - repetition is the mother of learning, as they say, and besides, there are some nuances.
Step-by-step manufacturing process:
- The soap is cut into small pieces and placed in a pan.
- Add water at the rate of 0.5 liters per 1 cut piece of soap. The most important thing here is that the water completely covers the pieces of soap.
- We take another larger pan, fill it with water and put it on the stove - this will be our water bath. Fire is medium.
- Stir the soap pieces until they dissolve. As soon as this happens, turn off the heat and add vinegar - a chemical reaction will occur. a reaction with the release of a white substance is stearin for our candles .
- We wait for the solution to cool down - you will get a solid base that will need to be broken into pieces and washed under water, then dried by spreading it on a cloth.
- Using a steam bath again, melt the stearin pieces.
- Next, take the wick and place it in the mold. How to do this, as well as the forms themselves, and then until you get the finished candle, has already been described above.
Note: of course, you can buy ready-made paraffin in bulk in the form of shavings and make candles from it. But we decided to present these methods, because... These materials can be purchased at any hardware store and in small quantities - which is important for a beginning candle maker.
Silver casting at home
Important! Casting silver with your own hands is a complex and fire-hazardous process. Your workshop should have fireproof stands and fire extinguishers designed to extinguish live electrical equipment. Be sure to wear fire-resistant gloves, an apron and goggles.
For casting silver at home, beginning craftsmen usually choose the following technologies:
- wax modeling
- earth casting
- heating the crucible with a gas burner.
Of course, if you have a muffle furnace with adjustment and maintenance of a given temperature, a vibrating table and a centrifuge, your castings will only get better.
Casting silver at home is a complex process, but quite feasible with proper preparation and perseverance. Good luck in mastering this branch of metallurgy!
Source