When choosing an outfit for ourselves, we strive to complement it with stylish accessories.
But sometimes it’s so difficult to find something that will appeal to you. And you always want to emphasize your uniqueness.
After all, sometimes a simple trinket can effectively enhance your image. And how can you, by the way, complete your ensemble?
Handmade jewelry is considered original and truly unique.
By making it yourself, you will not only realize your wishes in the invention, but also get a lot of pleasure from the result you see. And you can also save a lot of money.
Material you can't do without
Before you begin the creative process, you should prepare the material for making jewelry with your own hands. Of course, the most popular such material is various kinds of beads and seed beads.
The range of their applications is wide - they make beautiful bracelets, necklaces, earrings, beads, etc.
Knitted jewelry is also in great demand. It is made using ordinary knitting needles, crochet hooks, and in other cases using yarn, wire, and decorative braid.
In this way, every type of jewelry that can come to mind is created. They look graceful and elegant, despite their inexpensive cost.
Original and creative ideas
Earrings
Creating interesting earrings will not be difficult; for this you only need the desire to create and your imagination. There are many interesting designs of earrings, we will present some of them to you.
If you like to be the center of attention then I think you will love bright and unusual pom pom earrings.
To create it we will need: a chain, pompoms or material for them (acrylic threads), fastening a cap for beads and the earrings themselves. And also pliers to securely fasten all components.
We take ready-made pompoms already attached with caps for beads.
Then we attach one end to the chain and attach the other end to the earrings. It is also possible to add beads or stasis to the design.
If you need to make pompoms, use these diagrams.
Tassel earrings are another interesting and extraordinary design.
These earrings will playfully dilute even the most ordinary outfit and add lightness and sophistication to the image.
And it’s not at all difficult to make them, for example, try this model. For this we will need: silk thread or floss, scissors, pliers, ear wires.
We take the thread and make two identical pieces 30 cm long. After this, we wind the thread onto a cardboard about 8 cm wide, then we tie its edges, and tie the thread in the middle with thread.
On the opposite side, we bring scissors under the threads and cut the threads so that both edges are the same length. Then we take the prepared 10 cm threads and wrap our workpiece along the upper edge 2 times. After this, tie a knot and trim the edge of the thread. We put the cap on the top edge of our earrings, and attach the earrings on top. This model looks interesting in a single-color version, as well as with the addition of other decor.
Headband
If you are a hair jewelry lover, then I think this idea is just for you.
Because it is an original hand-made headband that can complement your look so effectively. It looks bright and festive, which makes it relevant today.
To create, we will need: a glue gun, a base for the headband (that is, a headband), as well as accessories for decoration and tweezers.
First, let's take our headband; it can be plastic, iron or fabric-covered. Now, little by little, apply glue to the base of the rim and glue the beads.
Be careful that the glue does not stain the beads, otherwise it will dry quickly and the appearance of the product will not be aesthetically pleasing. Once the beads are glued, we leave the bezel to dry. And our decoration is ready.
And also if the base for the hoop is fabric, the beads can be sewn on. To do this, each bead is threaded and sewn to the product.
The headband made of wire and beads also looks very gentle and elegant.
To work, take the wire at one end, fold the wire, thread the beads in half and thereby secure the edge.
We thread each subsequent bead onto the wire and make several turns at a distance of 0.5 cm, thereby fixing it.
So we continue to weave our headband. At the end, when the main work is done, we attach a tape to the edges of the headband, with which we will attach it to the head.
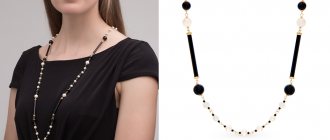
Necklace collar
A necklace of this design is quite a universal item that goes well with different clothes.
Don't miss: How to make a baby book
In addition, it is easy to do and does not take long. For the nago you will need: a chain, felt, beads, thread, needle, glue, cardboard for a template.
To begin with, you should draw a drawing of your future product on cardboard and cut it out. Then, placing the cardboard on the felt, cut out our details. Once the parts are cut out, we can begin decorating our decoration. Using a glue gun, we attach the beads to the surface.
The chain serves as a connection between the two parts of the collar. This decoration looks stylish and extraordinary.
Basic Rules
Having decided to master the described “jewelry craft,” the first question that should arise is where to start making jewelry with your own hands.
So, the most important two tools to remember are scissors and a clamp. A special clamp is needed to compress and unclench the rings connecting the product itself; their diameter varies from 2 to 5 millimeters.
Some decoration elements can be created with your own hands from polymer clay.
Among other things, there are a huge number of weaving techniques. For example, Shambhala bracelets are based on macrame basics. Beadwork is often done by young fashionistas.
Products made from genuine leather, made using the cord soutache technique, creations made by felting - as you can see, there are a lot of handicraft techniques - for every age, for every taste and for any purpose.
Note!
How to make wooden shelves with your own hands - original design options
Kinusaiga technique for beginners: what is it, a description of creating paintings from threads
- How to weave a figurine from rubber bands: how to learn to weave animals, toys and what you can make from rubber bands on a slingshot
Basic techniques and patterns of bead weaving
Let's look at the basic techniques for weaving beaded jewelry for beginners. Of course, you can start with easy beaded jewelry that does not require patterns at all, but in order to create a more complex model, you cannot do without basic techniques.
Stringed
Low - the simplest technique, which involves simply stringing beads onto a base. It is rarely used in its pure form, but there are exceptions to any rule. For example, simply stringing large beads a la pearls onto an elastic band, you can create a delicate ring in addition to a romantic look.
Don't underestimate the thread: this is where all weaving techniques begin. Moreover, long braids are used to create very interesting bracelets and necklaces.
Loop technique
Loop weaving is a direct evolution of the usual woven pattern: simply groups of beads form loops. The technique is used to make jewelry with now fashionable plant motifs - all kinds of petal flowers and others like them. However, more complex options are also possible.
With this technique, you can close the loops in different ways: by simply twisting (wire) or by passing the thread into one or more beads of the weave.
Mosaic weaving
Mosaic weaving (peyote) involves laying beads as tightly as possible, in a checkerboard pattern. The result is a spectacular, even beaded fabric, but more often “mosaic” is used to create all kinds of strands. The main scope of application is bracelets, necklaces, chokers, lariats.
There are countless ways of mosaic weaving, but we will focus on the simplest. You're just starting to weave beaded jewelry, right?
- We work on one thread, collect an even number of beads.
- We collect the first bead of the second row, pass the thread through the second bead of the first row.
- We repeat the steps until the end of the row, passing the thread through each even bead.
- We weave the third row in the same way, alternately passing the thread into the bead of the third and second row.
When weaving strands, the same mosaic technique is used. The only difference is that the first row of beads is closed into a ring. Thick strands are used independently, thin ones are woven into spectacular braids.
"Bricks"
Brick weaving visually resembles the already described “peyote”, that is, the mosaic technique. However, the “bricks” involve the formation of loops, and this technique is somewhat more complicated.
Using the brick technique, you can create amazingly intricate shapes. The weave is very tight and does not unravel or deform.
Parallel weaving
To create small decorations, you can use quite simple but effective parallel weaving. It involves threading threads towards each other.
Weaving beaded jewelry using the parallel technique is not difficult, but it is clearly not suitable for making large items.
Crosses
Cross weaving is often used in the manufacture of beaded rings, bracelets and openwork flat necklaces. Its essence is that four beads form a cross. When adding beads, the crosses turn into rings.
You can weave “crosses” with one or two needles. The second option is easier to understand and easy to read according to the diagram.
Circular technique
The circular technique is often called "French". In this case, weaving is carried out from the axis, which is the first string. Each subsequent row is laid along the previous one and attached to the main axis at two points.
The circular technique is extremely simple to understand. With its help, you can create elegant pendants, brooches and earrings - in short, small-sized jewelry.
Circular weaving is very loose, since the rows are not actually fastened to each other in any way. Therefore, it is rarely performed on thread and fishing line. More often, a wire that holds its shape is used as a base.
Stylish multi-tiered beads
Having decided to decorate cool beads in an ethno-style, you should still rely on a master class on making jewelry with your own hands.
Let's prepare several brass medallions, ceramic beads, agate and carnelian beads, various wooden beads and a brass lock.
It is very important that each bead has its own unique pattern. We collect all these elements on a thick wire, durable cotton cord, and connect it all with connecting rings:We determine the number of tiers and the location of the beads. We outline the distance between the brass medallions with thread.
We start fastening with medallions. A cotton cord is tied to the rings and surrounded with several turns of wire. Next we string the elements in order.
When the main task is completed, we approach the top of the necklace. We measure the length, tie a cord with beads strung on it. We fasten half of the lock on each side.
Note!
- How to properly make a birdhouse with your own hands from scrap materials: we create an original birdhouse according to sketches
- How to make candles with your own hands: instructions for making wax, gel, scented, homemade decorative candles with a wick
What you can make from foamiran with your own hands: we create flowers, Christmas tree decorations, snowflakes, three-dimensional paintings (photo + video)
Fastening elements and necessary tools
To create jewelry from beads, you need to acquire not only beads and a base, but also accessories. It is clear that experienced craftswomen have accessories for all occasions in their arsenal, but for beginners it is better to buy them depending on the chosen product. These can be all kinds of fasteners and locks, extension chains, auxiliary rings, rondels, clips, caps, earrings, and so on.
Craftsmen know that it is not so difficult to make a necklace from beads, but to carefully secure the clasp, you have to tinker. Therefore, there is no need to buy accessories in bulk: it is better to purchase only what is needed for a specific model, but of good quality, and do not rush when installing caps and fasteners.
Of course, we shouldn’t forget about the tools. At a minimum you will need:
- sewing scissors,
- special needles for beads,
- wire cutters (powerful enough)
- tweezers for working with small beads,
- round nose pliers for clamping fittings,
- silicone or felt mat,
- jars and/or organizer for working with beads.
Over time, if you become seriously ill with beadwork for a long time, you can expand your creative arsenal to make working with beads more comfortable.
Shibori
The Japanese shibori technique of making jewelry with your own hands is incredibly beautiful and deserves special attention.
Jewelry is made using specially dyed silk ribbons, beads and beads. The basis of such needlework is a sketch.
Fashionable DIY jewelry can decorate any style, complement the most formal look and become the calling card of its owner. The main thing is not to overdo it!How to choose beads?
It is almost impossible to make a beautiful decoration from low-quality beads, so you need to carefully consider the choice of material. Savings here should be reasonable, without compromising quality.
Let's consider the main points that a beginning craftswoman needs to take into account.
Material
We associate classic beads with glass, but they are made not only from this material. There are ceramic and even metal beads! Small beads made from natural minerals are theoretically not classified as beads, but stones and beads often complement each other, especially in designer items.
And for children's creativity, plastic beads are often used. Products made from it do not look so impressive, but beads made from artificial polymers do not have sharp edges that can hurt you, and their cost is minimal.
It is believed that the art of making beads originated at the dawn of glassmaking, about 5.5 thousand years ago, in Ancient Egypt. Glass beads were made by hand and were quite expensive.
Manufacturer
Nowadays, hardworking Chinese make absolutely everything, including beads. The cheapest Chinese beads can be immediately discarded due to poor quality: they are uneven, different sizes within the same size, and there are many defective beads in the batch. Even if you manage to weave something more or less decent out of it, the product will quickly lose its attractive appearance due to poor-quality coloring.
The beads offered by certified Chinese manufacturers are much better. It can be used for the first jobs until you get the hang of it. Beads of similar quality are produced in India and Taiwan.
And experienced craftswomen prefer to work with high-quality and expensive Czech and Japanese beads. It doesn’t cost a penny, but the weaving is dense and uniform, and the products are stronger and more durable.
Form
A classic of the genre is round beads, which are balls with holes. But the variety of bead shapes does not end there. Often used in weaving:
- bugles, which are pieces of glass tubes of different lengths;
- a cutting that looks like a very short glass bead;
- drops - sort of droplets with holes near the top;
- Charlotte, which has a cut edge;
- figured beads, which can be anything: cubic, pyramidal, cylindrical, in the form of stars, barrels, and so on.
Weaving with beads can be interspersed with other elements. Beads of all shapes and sizes, artificial pearls and metal charms are often used.
Size
The size of the beads is usually indicated on the bag. It indicates how many beads can fit on an inch of base. That is, the larger the number, the smaller the bead size. This rule applies to Czech and Chinese beads.
Czech bead sizes
The beads are very small, so size errors are inevitable. But the Japanese have achieved outstanding success in this field: they make the smoothest beads. It is ideal for dense weaves, including strands. Openwork decorations, paintings, beaded trees and others like them are not so demanding on the sizing of beads.
Palette
Beads can be matte, transparent or translucent, painted in hundreds of colors, coated with metal and various pigments. Even individual beads can be two or three colors!
Transparent beads can contain colored elements inside, shimmer with all the colors of the rainbow, and change color depending on the lighting. There is a very complex gradation of bead types by color, which is worthy of a separate article, but beginning craftswomen don’t have to bother with this: just create for yourself for pleasure.
The most important thing is the quality of painting: the durability of the product depends on this parameter. The most preferable in this regard are beads with coloring throughout the entire mass, and not just on the surface. And, of course, Japanese.
Photos of making jewelry with your own hands
Please repost
0
Bead bracelet
Bead bracelet - an original decoration idea
- To make a bracelet you will need:
- thread, needle,
- beads,
- metal button,
- leather cord with a diameter of 2 mm and a length of about 1.5 m,
- glue, stationery pin.
Jewelry manufacturing technology
- Place a button on the leather cord and fold it in half, aligning the ends. Tie a knot under the button, but do not tighten it. Thread a thick thread into the needle (it should be slightly longer than the lace), fold it in half, thread it into a knot and tighten it as tightly as possible.
2. Apply glue to the knot and wrap a thread around it so that it sticks well.
3. Pass the thread under the right side, string the first bead onto it, then pull the thread under the left lace and tighten.
4. Put on the next bead and pull the thread under the right cord again. String beads along the entire length of the bracelet in this way.
5. When there are 10-15 cm left to the end of the lace, fasten the thread so that the bracelet does not unravel. To do this, wrap it around the laces, glue it and carefully trim the ends.
6. Connect the laces and tie a knot. Try on the button for size and tie another knot, making a loop in this way.
7. The bracelet is wound around the hand in several rows and secured with a loop placed on a button.
How to make a stone pendant
Stones are an excellent material for making jewelry, and we are talking not only about diamonds, emeralds, rubies, but also semi-precious and ornamental stones. However, their processing requires special equipment, so willy-nilly you will have to go to a special store.
There you can buy stones already prepared for working with them at home. It can be:
- Flat cabochons. Such stones are convenient for gluing wood, leather, polymer clay, and so on.
- Beads. They already have holes made for threading fishing line or thread.
- With an ear. In fact, these are ready-made pendants - you just need to add bail and hang them.
Stones without holes and ears can be used in conjunction with epoxy resin. It is better to prepare a transparent composition to highlight the natural beauty of the mineral.
But if you really want to create something with a stone, you can call on wire to help and simply braid the mineral according to your own imagination.
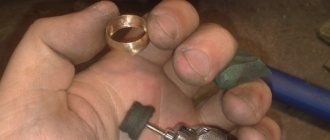
What gold items will the new jewelry be made from?
Making rings from your own gold to order is not as profitable as it seems at first glance. In terms of price, designer jewelry is clearly superior to mass-produced jewelry - the process of making jewelry by hand is long and painstaking, and not a single craftsman will work at a loss.
Making wedding rings from your own gold is justified only in a few cases:
- You have enough scrap at your disposal to cover the cost of making a new ring.
- It is important for you that the new decoration be made from the old one (we warn you: this is not always realistic).
- You want to get a truly exclusive piece of jewelry and are willing to pay a lot of money for it.
Not all workshops undertake the manufacture of products from the customer’s gold. The exception is 999 fine gold bars. All workshops work with it without restrictions.
Not every gold item (or scrap) will be accepted for making new jewelry. This is only possible in the case of modern products with the Russian Federation hallmark. They can be practically new, worn out or even damaged, but they must have a hallmark and a name tag (the signature stamp of a licensed master or manufacturer).
Production time
If you want to have a custom ring made from your own gold, you need to be patient. It is extremely rare that you can go for finished products in a couple of weeks.
In most cases, the process lasts for one and a half to two months, especially if we are talking about an exclusive product designed by the customer.
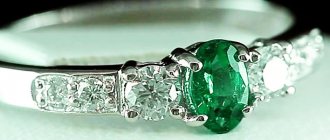
Gold ring with diamonds in the SUNLIGHT catalog
How is the cost of the finished product determined?
The actual cost of the work is calculated based on many factors:
- Material price. The more high-grade gold the master uses, the higher the cost of the final product. And when making, for example, a silver ring, the price of the material is, of course, taken into account, but it takes a small share in the final pricing. We must not forget about the cost of precious stones, and it can also be quite large.
- Difficulty of work. A complex model will naturally cost more than a smooth wedding band. The most affordable option is to choose a product from the proposed catalog: the workshop will already have special forms in stock, which will reduce the cost and time of work. Jewelers work much longer on individually designed models (according to an exclusive layout), which is reflected in the price.
- Technological nuances. For example, an engagement ring can be made in two ways. First: a narrow gold plate is cast, closed in a circle, welded and polished. With a professional approach, the product is obtained without any traces of seams. The second option: take the appropriate mold, pour hot jewelry alloy into it - and get a monolithic piece of jewelry. The second method is much more expensive, but many clients prefer it.
The workshops do not make absolute copies of popular brand models - no one needs copyright problems. But you can order a product very similar, for example, to a Love ring or a “nail” from Cartier. There will be a difference in nuances, but only a specialist will be able to notice it.