Every girl in childhood wove cute baubles from rubber bands and strings, which, if desired, can be supplemented and turned into full-fledged beads. The basis for an interesting decoration will be beads, pieces of fabric, bottle caps, paper napkins and other available materials.
If you have enough of any of the above, we suggest implementing one of the ideas described below to become even more beautiful, more original and brighter.
Benefits of homemade beads
When making stylish jewelry, the master himself controls the work process, has the opportunity to independently select the decor and draw up an assembly diagram. There are also a number of advantages to independent creative work:
- Large selection of models. Ready-made diagrams, photos and video instructions for work are freely available.
- Creating original beads does not require special skills and abilities - any novice needlewoman can learn the craft.
- Every mother has the opportunity to give a teenage girl a beautiful necklace made according to an individual design (for prom, for New Year, for a friendly party).
- When working together with a child, both masters - both parent and child - will receive a lot of pleasant impressions.
Making beads is always a creative, exciting process that captures the master’s attention from the very first minute.
What will you need?
Depending on the chosen design, a novice needlewoman may need:
- Beads and seed beads. We calculate the length of the beads in accordance with the sketch, add 10% for all sorts of surprises and defects, and buy exactly as much as was calculated. If necessary (to create bead braided beads and complex combined models), we also buy beads. It is best to take Czech or Japanese.
- Accessories. You are guaranteed to need fasteners. It is better to give preference to reliable carbines of various modifications. No matter how much you would like to use trendy toggles or magnetic clasps, you need to understand that in terms of reliability they are significantly inferior to the simplest carabiners, which can also be very elegant. If funds allow, it is better to give preference to European, American or Israeli products. Depending on the model, you may additionally need rings, callot clips, jewelry gimmicks, caps, sections of chain, crimps and others like them.
- Material for stringing. The most advanced material for creating jewelry is jewelry cable (lanka). Often, beads are also strung on ordinary fishing lines (nylon monofilaments). If you take a real Japanese fishing line with a diameter equal to the hole in the bead, then this option has a right to life. But if plasticity is required from the decoration (for example, you are making a multi-tiered necklace), then it is better to use a thread, and an artificial one - it is stronger.
- Tools. The needlewoman's arsenal necessarily includes scissors and needles, as well as special tools. You can do without special tools in the first stages, but it is more convenient to work with them, and the result is more accurate.
- Additional elements. Each design may involve the use of separate basic and decorative elements, which also require some expense. You may have to purchase leather cords, ribbons, charms, wooden beads - in short, everything that is needed to implement a specific idea.
You shouldn’t jump into complex things right away: first, you can test the simplest options. You can create several simple beads, varying in length, from different stones, and wear them at the same time - layering is now in trend!
Selection of materials for work
First of all, you should choose the main material that will make up the decorative part of the beads. This role may include:
- Decorative stones (carnelian, amber, malachite).
- Bead weaving.
- Satin ribbons.
- Wooden balls.
- Figures made of clay or salt dough.
- Fabric details.
You also need to select materials for the frame. This can be metal wire (chenille or copper), strong threads for holding decorative parts.
During the work you will need scissors, glue, and additional fittings (to create a fastener). You should also prepare diagrams for making beads yourself.
Master classes on making beads
Bright handmade beads will highlight the wardrobe of every girl and woman. For work, you should prepare a well-organized workplace with a sufficient level of light.
A variety of available materials can be used in the manufacture of original beads. The most striking and stylish work options are:
- Beads made of decorative stones.
- Beaded necklace.
- Multi-tiered beads made of wooden balls.
- Decoration made from textile balls.
- Beads made of satin ribbons and large beads.
- Necklace made of foil balls.
Each of the presented master classes has detailed instructions on how to assemble the beads yourself.
Bead sets
Before working with this material, you need to sort all the beads by color and size; for this you can use disposable dishes or cups.
Separate threads are collected from beads, which can be woven together, creating real masterpieces, or balls made of different materials can be glued with separate beads.
Beads made of decorative stones
To work, you need to prepare metal fittings with a built-in fastener and several tiers of metal thread. Next, you should choose a model of beads and the location of decorative elements. It is better to make a preliminary sketch or use a ready-made bead design.
Decorative stone for work can be purchased at craft stores. Such working parts have a special slot for attaching to a frame thread. The prepared stones are strung according to the chosen pattern, and the stone is fixed in place using metal stops.
Note!
- DIY feeder - step-by-step instructions for creating a feeder + detailed diagrams with photo reviews
Do-it-yourself rugs - TOP 120 simple patterns with master classes on how to make them yourself + photo reviews of finished rugs
Do-it-yourself dolls: a master class on making a beautiful doll. Simple instructions with photo examples of ready-made options
First steps
Before visiting a retail outlet with goods of the relevant theme, you need to carefully consider the style, materials and design of the products. This will protect you from unnecessary spending.
A visual inspection of the basic wardrobe will help you decide on the direction of your activity. It is necessary to decide for which set of clothes the decoration will be made, decide on its design and source material.
We recommend reading:
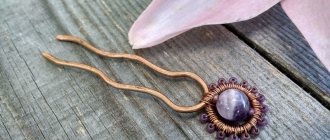
- DIY hairpins: step-by-step guide + instructions. 100 photos of finished hair jewelry. Master class for beginners
DIY brooch - the best step-by-step instructions with description. Photos of finished products, as well as a master class for beginners
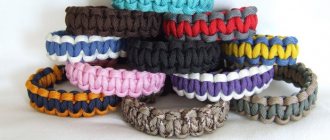
How to weave rubber band bracelets with your own hands - a review of the best weaving patterns. TOP 100 photos of different methods and beautiful weaving patterns
You can look for ideas for creativity in the collections of famous designers or on thematic websites. Having thought through the appearance and material for work, it is recommended to draw a sketch.
Beaded Necklace
Today, craftsmen are presented with a huge assortment of beads: round, cylindrical, multifaceted, painted in various shades, matte or with a glossy sheen. The frame can be a fairly strong thread or metal wire, which has the best strength indicators.
Instructions on how to make beads with your own hands:
- According to the chosen weaving pattern, twist the base of the frame.
- String beaded elements in a continuous layer on each row of weaving.
You can also use decorative stones in your work, which will look advantageous against the background of the beaded fabric. The final stage is the formation of the fastener - for this you should arm yourself with fittings purchased in the store.
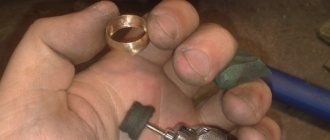
First choose the canvas
There are several rules here. There should be no chips or cracks, otherwise the future bead will simply crumble during polishing. When a piece is selected, the manipulation zone is marked. The edges may protrude a little, but this is not that important. Silva calls mountain opal the most difficult to work with. It is worth practicing on stronger rocks first.
On a professional grinding machine, the initial cutting is carried out, and the product becomes relatively round. The main assistant in this matter is a rod compass. Next, you need to make a hole in the center of the future thing. This also happens in 4 stages. The workpiece is placed in a brass tray with a constant supply of cold water. Take diamond drills in increasing diameter: 0.75 mm, 1 mm, 1.5 mm, 2 mm. So the diameter is considered the most optimal for stringing valuable stones.
Afterwards, the final stage begins to give the final shape. Final polishing. They use a vice that clamps the mineral, and a grinding machine with several types of attachments. Next, the beads are checked for the presence of defects and the remaining polishing residues are finally removed with a special paste.
D. Silva warns novice jewelers that the correct shape may not be obtained immediately. His early creations did not have perfectly straight sides.
Multi-tiered beads made of wooden balls
An original decoration made from wooden balls has a number of advantages:
- Beautiful color of the main elements.
- The balls are light in weight, which reduces the load on a woman's neck.
- The wood is pleasant to the touch and retains heat well.
The work on creating such jewelry is carried out according to a similar scheme with stone beads. The only difference is that the largest ball is placed in the center, and as it moves away to the periphery, smaller diameter parts are placed.
Decoration made from textile balls
To create beautiful beads you will need the following set of materials:
Note!
- DIY satin ribbon bows - step-by-step instructions for creating unusual bows + detailed diagrams with photos
- Do-it-yourself furniture restoration: step-by-step master classes on restoration at home (120 photo ideas)
- Do-it-yourself rack: step-by-step instructions with photos and descriptions on how to make an unusual rack
- Pieces of fabric in several colors.
- Scissors.
- Filler (batting).
- Strong thread (you can use knitting yarn).
- Several large beads.
- Accessories.
Instructions on how to make fabric beads with your own hands:
- Each textile blank must be sewn with seams to obtain a ball-shaped cover.
- Stuff it with batting and sew it up. If desired, you can wrap each ball with decorative mesh.
- We insert the thread into the coal eye, pierce each ball with a needle, stringing the component elements onto the thread.
- Before and after each ball, a large knot should be tightened, which will fix the element in one place.
Textile balls can be alternated with additional decorative elements of different colors to achieve a subtle contrast.
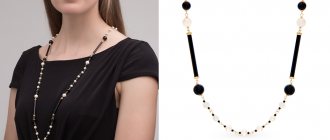
Jewelry made from ribbons and beads
As a frame base, you can also use multi-colored fabric ribbons, on which large beads or decorative stones are strung.
An excellent solution would be to choose a black ribbon and snow-white beads with a matte texture. The ribbon should be tied into a knot after each bead is strung.
Decoration made from foil balloons
To work, you will need ordinary food foil, thread and a needle, and accessories for forming a fastener. Instructions on how to make original beads:
- Cut the foil into square-shaped pieces.
- Crumple each square into a ball shape.
- If desired and have sufficient free time, you can polish the surface of each ball.
- Thread a needle and sew through each ball, stringing it onto the frame.
This type of decoration does not require additional decor, since foil balls have a pleasant glossy shine.
Note!
- Corrugated paper flowers: TOP 100 photos of ready-made options + instructions on how to make them yourself
- DIY family tree: instructions for creating a family tree + DIY design ideas
Do-it-yourself sun lounger: photos with instructions for creating sun loungers + detailed diagrams of the stages of work
Clay or dough
Polymer and plastic clay, like salt dough, are excellent for modeling; using this technique you can create beads of different sizes and geometric shapes.
After heat treatment, individual beads are decorated, decorated with geometric designs or attractive paintings, varnished and combined into beads.
NOTE!
Decorating bottles - beautiful and original ideas for decorating bottles with your own hands (120 photos and videos)- Hair jewelry: the best ideas for choosing hair jewelry and tips for choosing a design (105 photos)
- Sushi Master - Japanese restaurant in Chita