Useful tips
The most wonderful spring holiday is just around the corner, and I want to prepare something special
. Why not make a gift for March 8th with your own hands? We offer you ideas for creating original jewelry that will delight your loved ones.
- DIY bracelets
- DIY rings
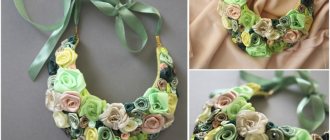
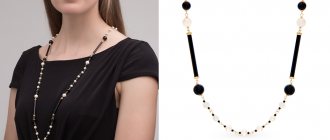
- DIY necklaces
- DIY hairpins
- DIY earrings
DIY bracelets
Elegant bracelet
– a wonderful decoration that is loved by women all over the world.
It turns out that making an original bracelet with your own hands is not so difficult. Materials for these fun little things can be purchased at specialty stores
, including online stores that offer accessories for DIY jewelry.
What you may need for a double bracelet:
- Leather cord 1.5 millimeters thick and 1-1.5 meters long
- Yellow copper ball chain or rhinestone braid 30-40 centimeters long (about enough to wrap around your wrist twice)
— Waxed lace or any thick thread 1.5-1.8 meters long
— Yellow copper hex nut with a diameter of 0.6 centimeters
- Scissors
The braid with rhinestones looks something like this.
It can be found in any jewelry supply store. Let's get started:
1) Fold the leather lace in half to make a loop. This loop will serve as a clasp and should accommodate a nut.
. Tie a loop with colored waxed thread and wrap it around the base 5-6 times so that the thread does not subsequently loosen or come undone.
2) Place a ball chain in the center of the leather cord and begin tying it with colored thread, grabbing each bead one at a time.
3) Continue tying the leather cord with the ball chain until you get the desired length
to wrap your wrist twice.
4) When the desired length is reached and the ball chain ends, tie the leather lace with colored thread several times and tie the end of the leather cord with a knot.
5) Place a nut on top and make another knot to secure it.
6) Cut off the unnecessary lace at the end with scissors, wrap it around your wrist and secure the “lock”. The bracelet is ready!
The length and quantity of materials are indicated for a double bracelet, but you can make single or triple bracelets. The threads can be any color of your choice.
Popular methods
Foil
How to clean a silver chain - use food foil. The aluminum in its composition reacts with silver sulfide (sulfur compound) and destroys the black film.
Method No. 1
Line the bottom of the pan with a piece of foil. Pour water into it (to a height of 3-4 cm from the bottom). Add 2 tablespoons of baking soda (you can use citric acid instead of soda). Place the decoration in the pan. Place on the stove, boil and keep on fire for 3-5 minutes. If the chain has not brightened, the time can be increased.
Method number 2
Spread the foil on the table. Place the decoration on it, add 2 tablespoons of salt and pour in a little water. Fold everything into an envelope and place it on the bottom of the pan. Pour a soap solution of a glass of water and 1 teaspoon of laundry soap. Bring to a boil, remove from heat, wait 15 minutes.
DIY pin bracelet
Bracelets made of pins and beads
- a beautiful and very simple decoration that can be made in several versions, it all depends on your imagination and available materials.
What you will need:
— Pins
— Beads
— Elastic stretch cord
Let's get started:
1) Make a lot of blanks
from beads and pins. Combine colors as your imagination wishes: you can make single-color rows, or multi-colored ones. Beads of different sizes and textures also look good side by side.
2) Prepare 2 long pieces of elastic cord and string pins on them.
3) Pin the ends of the laces together when the bracelet reaches the desired length. As you work, place the bracelet on your wrist to check its length. Don't make it too tight that it restricts the blood flow, or too loose that it flops around.
Operating procedure
The first step is to create a sketch of the pendant.
Then it must be molded from the prepared mass. To do this, you can use a mold and make an impression. You can also mold it by hand.
The workpiece is dried in the oven according to the recommendations for working with this type of material.
The fastening is secured using universal glue.
After drying, the decoration can be painted and varnished.
There are many design options for such pendants. Photos of a homemade pendant made of polymer clay can be found on thematic websites.
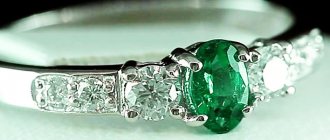
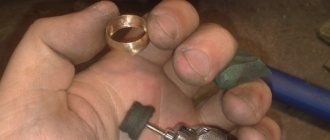
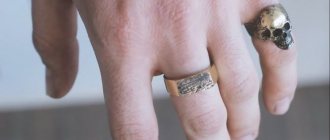
How to make a ring with your own hands
Do you think that it is impossible to make an original ring at home? You are wrong! It turns out that you can find a lot of unnecessary things
, which may be useful to you in your work. Let's take, for example, old forks, spoons, knives that you haven't used for a long time, but you feel sorry to throw them away.
an original ring from old iron utensils with elegant handles in a couple of minutes
.
What you will need:
- Any old forks, knives, spoons with beautifully decorated handles. This is the basis of your product. It's better if it's silver
— Metal cutter or hacksaw
— Pliers
- Sandpaper
— A sheet of thin paper
- Pen
Let's get started:
1) First, decide for yourself what kind of rings you want to get
.
You can choose one that seems to wrap around your finger - type 1 (Fig. 1)
, or one of its ends will be hidden and will not be visible -
type 2 (Fig. 2)
. The length of the workpiece depends on this.
2) At the second stage, you need to choose a suitable cutlery, which will soon turn into a ring.
3) Take a strip of paper and wrap it around your finger
, on which you will wear the ring.
Mark with a pen where the strip meets the other end. If you choose a type 2 ring, add about 6 millimeters
and add a bold mark. If you chose a type 1 ring, then there is no need to add extra millimeters.
4) Using the resulting paper measurement, you can make a blank for the ring by cutting off the fork handle in the right place using a metal cutter or hacksaw
.
5) Sand the cut edge of the fork so it's not sharp and you won't get hurt when the ring is finished.
bend the resulting tip of the fork into a ring using pliers
. If the fork is made of silver, you can bend it without problems.
7) The result should be something like this:
Homemade button ring
a base for a ring at a jewelry making store.
, to which you can attach any details: buttons, beads and other materials. An original ring can be made from old bright buttons and a piece of fabric.
What you will need:
- A round piece of thin black felt with a diameter of approximately 5 centimeters (1)
— Decorative buttons in desired colors (2)
— Superglue, but an electric glue gun is better (3)
— Ring with base (4)
— Pliers for jewelry (5)
Let's get started:
1) Remove the sewing loops from the buttons using pliers.
2) Glue the buttons to a piece of felt from the center in a circle close to each other
to make a round shape. Let the glue dry thoroughly.
3) Cut off the excess felt from the sides. The edges can be left a little uneven.
4) Lubricate the base of the ring well with glue.
5) Glue the ring to the button part you received earlier. Let dry.
Glitter pendant
An unusual and easy-to-manufacture pendant can be made using practically available materials.
To work you need to prepare:
- base of a metal product,
- glitter,
- glue for decoupage.
Operating procedure.
- Apply a layer of glue to the prepared base and carefully place glitter on it.
- Then the workpiece is again covered with glue, on which another layer of glitter is placed.
- The number of layers depends on the base of the decoration.
This method can give a second life to a pendant with lost decorative elements or a boring old pendant.
DIY feather hair clip
Hair clips with feathers
look very impressive. If these are bright and colorful feathers, then the decoration is suitable for festive outfits; if the feathers are of natural colors, such hairpins can be worn with everyday outfits.
What you will need:
— Regular base for hairpins
— A piece of felt material
- A glass or any round measure to cut out an even circle
- Feathers
— Beads or decorative buttons
- Scissors
- Glue gun or superglue
Let's get started:
1) Using a glass or other device, cut out two circles with a diameter of about 5 centimeters
or more depending on the size of the base clip.
2) After making the slits, insert the base into one circle of felt.
3) Glue two circles of fabric together with glue to strengthen the base clip.
4) Glue the first bottom layer of feathers on the back side, then the top one.
5) Glue a bead or decorative button to the center.
6) The hairpin is ready.
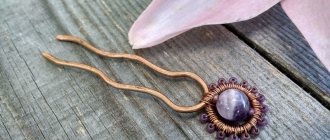
Stone framing
It’s also easy to turn an unusual natural or artificial stone into a designer decoration.
To work you need to prepare:
- wire of suitable section and color,
- pliers.
The work consists of creating a frame for a decorative element from wire by twisting it. A creative approach to making pendants will help you create a unique piece of jewelry.
DIY earrings
An interesting option for updating hoop earrings
You can make your own by adding hanging laces to them.
If you're tired of your regular hoop earrings, updating them couldn't be easier. What's more, the laces
are as easy to remove as they are to attach, so you can restore your earrings to their original look at any time.
What you will need:
— Any hoop earrings, in the example – with a detail inside the ring
— Thin laces of any color
- Scissors
Let's get started:
1) Prepare the desired number of laces of the required length depending on the size of the ring. Please note that the lace will be folded in half.
2) Fold the lace in half and pass the ends through the loop
, grabbing the ring as shown in the photo. Do the same with all the laces.
3) In the end you will have a product like this with “fringe”. You can also trim the ends of the laces with scissors.
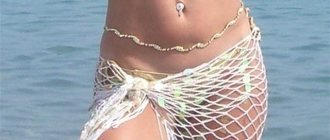
Pendant options
There can be a great variety of options and ideas on how to make a pendant with your own hands. You can use a variety of materials:
- Natural stones
- Shells
- Beads
- skin
- Clay
- Threads and ropes
- Wire
When developing the design and idea of a pendant, you can start from different points:
- Depending on what material you already have at hand, for example, a beautiful stone or an unusual large shell
- From the image that needs to be created
- From the color scheme of the decoration
Important! Typically, a pendant has a central large part, a frame and a cord or chain on which it is suspended. The central part sets the entire style, color scheme and image of the pendant; all other design elements must obey it. This must be taken into account when choosing materials.