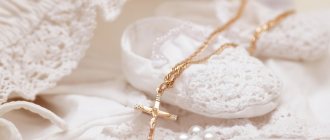
A medallion is a round or oval pendant on a chain, inside of which you can put any miniature thing, for example a photograph of a loved one or a lock of hair. The decoration consists of two parts connected by a hinge and opens like a book.
This accessory is shrouded in mystery and always becomes something special for its owner, as it contains his personal secret.
Its main difference from a pendant is that the medallion looks like a small flat box, inside which you can hide something. The pendant can be of any shape.
It is known that the famous Carl Faberge began his career with gold opening medallions.
History of decoration
The very concept of “medallion” originated in Ancient Rome . At that time, this was the name for a rounded disk, more like a large gold coin , which was hung around the neck of a military leader during a triumph.
In the Middle Ages, such decoration was popular among nobles, who most often hid small poisoned needles .
By the end of the Middle Ages, pendants began to be considered insignia. They were especially loved by sailors who hid the hair of their wives and children or pieces of their clothing inside. Such a little secret warmed their souls during long voyages.
During the Renaissance, medallions came back into fashion due to increased interest in antiquity. Accessories have again appeared among the jewelry of every self-respecting fashionista.
Such original pendants also had a practical use : a small pillow . This was an effective way to hide other unpleasant odors.
In the old days, people knew several ways to wear a medallion. Such jewelry was for both men and women, and could be on a belt, attached to clothing, a ring, or simply in a pocket.
Such pendants became most widespread in the 18th-19th centuries during the Victorian era. Many women of that time had a medallion with a photo in memory of their relatives and friends who died in the war.
How to make a medallion with a photo: step-by-step master class
Have you ever seen an antique medallion pendant with a photograph or picture on it and thought about how much the owner treasured those photographs? Previously, when such jewelry was in fashion, portraits and photographs were expensive exotica, and this way of maintaining closeness with a loved one served as a special way to maintain a connection. After all, this was at a time when there were no mobile phones and social networks. And today, in our ultra-communicative life, such a demonstration of close people with photographs is considered a sentimental gesture that is difficult to overestimate. And if you like such touching accessories, this master class is for you.
Today we will talk about how to make a pendant with a photo in a bead braid with your own hands. Beadwork is often used to braid glass and gemstone cabochons or to add decorative accents to jewelry, clothing, or accessories. We use photography in this project as the main element when creating an antique pendant collection. But you can easily transform the appearance of such a retro medallion into a more modern one by choosing a color image instead of black and white.
1. Preparing a photo for the pendant
A cabochon painting consists of a transparent glass hemisphere with an image glued to its flat side. For the medallion in our project, the cabochon is still inserted into a metal base - a setting with a loop for hanging around the neck. This is not necessary, but it better protects the drawing from moisture. Sets of glass cabochons with settings are sold in craft stores.
To make a photo pendant, print your photo and adjust its size and exposure to match the outline of your cabochon. An interesting feature of hemispherical cabochons is their ability to slightly enlarge the image and make it three-dimensional.
Once you've found the correct placement, crop the photo at the top and bottom. Apply Mod Podge or a similar colorless sealing adhesive to it and glue the glass cabochon on top. Remove any air bubbles and allow the glue to dry completely.
2. Attaching the cabochon to the base
Also, using glue, glue the cabochon with the photo to the setting platform, if you are going to use it. Wait for the glue to dry. In this setting, we folded the loop back to make it easier to braid. If this is not possible in your setting, you will simply have to braid it on the side of the loop.
3. Braiding the medallion with beads
Materials required for work:
- Beads in two sizes
- base for bead embroidery: you can use hard felt, etc.
- beading thread
- glue (you can use E6000 or rubber cement).
Whatever the size and style of your locket, you will need two sizes of beads. One, the outer row of beads will be large, and the inner row will be smaller. For a pendant measuring 18 mm wide and 25 mm high, you need round beads of size 11 for the outer row and size 15 for the inner row.
In the case of a larger medallion, you can take size 8 beads in the outer row and size 11 in the inner row.
4. Sewing beads using reverse stitching
Always insert the needle straight so that the beads lie flat.
Glue the medallion to the felt and wait until the glue dries.
Bring a needle with a long thread from the back of the felt as close to the cabochon as possible. Keep the needle strictly vertical. Leave 20 cm of thread on the wrong side. Pick up four beads, move them close to the medallion and sew them to the felt.
5. Continue sewing beads
Leave a gap the length of two beads and thread the needle back into the felt base. Place two beads on the needle and pass the needle through the four beads you sewed on before.
Cast on four more beads and sew to the felt.
Count out six beads and thread the needle through them in the opposite direction. Always keep the needle as close to the edge of the pendant as possible.
Thread the needle back through the six beads you previously sewed on.
6. Sewing on the last bead of the row
Continue sewing beads on, picking up four beads on each stitch and working your way back through six beads until the end of the row. For the last stitch of the row, cast on as many beads as needed to complete the row.
Pull the needle through the felt to complete the last stitch, then pass the needle through all the beads in the row, pulling the thread tight, but not too tight, so that the beads lift up from the base and stretch over the cabochon. Pull the needle and thread through all the beads at least 2 times, but preferably more. The task is to fill the holes in the beads and align the beads themselves.
Fasten off to complete the row. Our first row of beaded frames is complete.
Thread the needle back through the felt base near the tail of the thread left at the beginning of sewing. Tie the threads into a square knot, threading the ends of the threads into the beads.
7. Beginning of the second row of the bead frame
The second row of backstitch is to hold the cabochon in place. We'll use the same simple stitch, but instead of stringing four beads and sewing back at 6, we'll take two beads and sew four. This row of beads will be located above the first row, covering the edge of the setting or just the edge of the cabochon - in case you are working without a setting.
First, insert the needle as close as possible to the cabochon, into the space between it with the beads of the row that we sewed before. Leave a twenty-centimeter tail of the thread. Cast on four size 15 beads and pass the needle back through the felt between the finished row of beads and the cabochon. Stepping back a distance of two beads, go back through the felt base, take two beads, go through the four already sewn beads and pick up four more beads. Sew them to the felt and pass the needle between the second bead you just added and the third one.
8. We continue to make the second row.
Sew on two beads, string the next four and sew to the base. Pass the needle through the base two beads back, string four beads, sewing through two back to the end of the row.
Continue sewing, stringing on the last stitch the number of beads required to complete the row. String the last beads, and then pass the needle through all the beads at least twice, then stretch the felt so that the beads are straightened and their holes are filled.
Pass the needle through the felt next to the thread tail left at the beginning of the row and tie the threads in a square knot. Hide the tail ends inside the beads.
9. Trimming the felt base and finishing the backboard
Trim the felt close to the cabochon. Be careful not to cut the stitches.
Add a jump ring to attach the locket to a chain or cord.
If desired, you can sew several more rows of beads around your medallion.
The rectangular frame pictured has an extra layer of fabric on the back to disguise the pinned stitches. It also features brick and pictogram edging, which simply adds another bead to the outermost row of the bead frame.
So, our handmade pendant with braided beads is ready. This accessory will be a wonderful gift for a loved one!
Types of medallions
Each pendant is unique, since even two identical accessories can contain two completely different secrets.
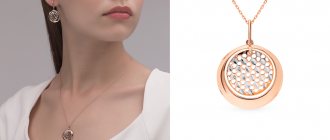
The medallion itself is usually worn around the neck on a chain, cord or ribbon. Most often it has a round or oval shape . There are also heart-shaped decorations.
These pendants are made from base metals, but jewelry medallions made from gold or silver and set with precious stones .
There are several types of special pendants that differ from the classic form:
- Pairs . Such pendants together form a special figure, most often a heart.
- Floating . Under the top part of the decoration, made of glass, small pendants are placed that “float” when moving.
- Openwork . The upper part is made openwork. It is problematic to hide anything in it, but this does not diminish the charm of the product.
Special medallions for solid perfumes have also become equally popular.
Dried flowers
Dried flowers have a special charm for some people. Of course, it is unlikely that you will be able to place a rosebud from the latest bouquet given by your admirer into your accessory, however, a small wildflower like St. John's wort or chamomile will fit quite well. It may or may not have a special meaning - for example, if you believe in the legend of the four-leaf clover that brings good luck, you can try a little harder to find it and create your own amulet.
What can be made from leftover leather?
What can you wear with a medallion?
There is an opinion that only true romantics . They are associated with young girls dreaming of true love. However, you should not give up this decoration. An accessory can decorate any look .
The main feature of the product is that it can be combined with many elements of clothing, for example:
- men's style shirts;
- dresses with cutouts;
- white T-shirts and T-shirts;
- turtlenecks with skirts.
Silver medallions and jewelry are more often worn with a casual look. They will also decorate business attire. Gold jewelry will look good, for example, with evening dresses .
A locket is a convenient, minimalist piece of jewelry that can enhance any look. It is best suited to the elements of a summer wardrobe, but the accessory can also highlight the beauty of an ordinary sweater. In addition, he can keep his master’s personal secret and warm his soul.