Wearing gold jewelry has been fashionable at all times. They add elegance to any look and style for both men and women. The only drawback is that such products are distinguished by their fragility. Their breakdown is far from uncommon. In order to repair a gold item, you need to contact jewelry craftsmen. However, it is not always possible to take your favorite chain to a jewelry workshop. Therefore, many people wonder whether it is possible to solder it at home? Many people mistakenly believe that soldering a chain at home requires a lot of knowledge and skills. In reality this is far from the case. In this article we will look at all the nuances of this procedure.
What defects can you fix yourself at home?
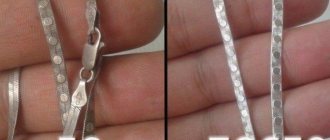
- Small cracks on the inside of the product. The location of the chip is especially important for wide chains, on which poor-quality seams after soldering are clearly visible.
- Break of one link in a multi-level weave. The chain did not break completely. One edge of the link has bent, which needs to be bent (soldered) so that it does not cling.
- The ring on the lock was bent and torn. You can solder it yourself, since it is located at the back of the decoration. And even if your gold seam is not the most beautiful, it will not be visible.
Complete breaks, defects on the outer side of the weaving, loss of several links - all these situations are best left to the shoulders of the master. A jeweler can not only solder a gold chain, but also add a little metal to recreate the original appearance of the threads.
Practical advice - video
If your chain is broken - silver or gold, then do not despair, but follow our instructions:
- Place all decoration pieces in a clean, tightly resealable bag.
- Find out where jewelry is repaired.
- Give the product to the workshop, having previously discussed the cost of the work. The more complex the repair, the more expensive the repairman’s services will cost.
- If you decide to repair the jewelry yourself, then in the workshop you can familiarize yourself with the soldering process and purchase a certain amount of solder. The last point is the main one, since it is extremely difficult to make high-quality solder for gold at home. And you don't need the rest of the alloy.
- If the clasp is faulty, purchase it separately. You can use a fastener made of a different material, the main thing is that the color matches. You can install the clasp yourself.
What instruments and devices will be needed for home soldering?
To understand how to solder a gold chain at home, you need to carefully examine the place of the chip or break. And also prepare all the necessary tools and equipment for work:
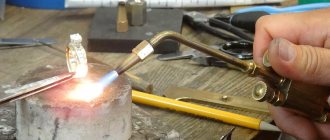
- a small gas burner with a thin torch - needed to heat the alloy;
- special gold solder, which is needed for correct soldering;
- homemade or purchased flux;
- small pliers and tweezers for gripping the product;
- a set of needle files of various shapes;
- a drill and a small vice for fixing the chain.
The soldering process is no different from working with other metals. The only peculiarity is the miniaturization of the product parts that need to be soldered to each other.
Important! If you have not worked with a blowtorch or soldered other metals before, you should not practice on gold jewelry. You can completely ruin the product. And then even the master will not be able to restore it.
Reasons for broken chains
Gold is a soft metal, so all jewelry made from it tends to break.
There are a number of reasons why a gold chain can break:
- A light weight . This is the most common reason for gold jewelry to break. In particular, this applies to products that were made from tubes. Repairing such a chain costs more than its purchase price.
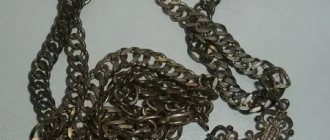
- In an attempt to untangle the chain . Very often the chain breaks after the owners try to untangle it. Over time, the links in the chain become loose. Accordingly, the older the jewelry, the greater the likelihood of breakage. To detect such a problem, you should examine the links through magnified glass. If the links are worn out, then they need to be replaced as soon as possible.
- Heavy pendants on the product . The weight of the pendant should correspond to the thickness of the chain. Otherwise, breakdown cannot be avoided.
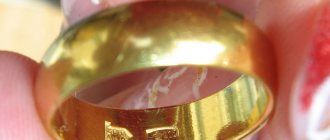
- Hollow product . Such gold jewelry easily breaks due to mechanical stress. They wear out quickly. Therefore, you should not hang heavy pendants on them.
- The product is of poor quality.
Important! To identify a hollow gold item, you need to hold it in your hand. The weight must correspond to the size.
Stages of soldering a gold chain at home
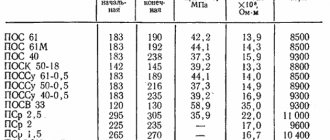
- Solder preparation. If you don’t have special solder for gold, you can create it from scrap materials at home. To do this, you need to prepare a crucible for melting metals, a small amount of gold, silver and copper. As well as pharmacy scales and a mold for melting solder. The recipe itself is as follows: for 585 parts of gold, take 115 parts of silver and 185 parts of copper.
- Preparing the chain for soldering. It is necessary to secure the product in a vice or other clamp so that the damaged area is visible. The product must take its original shape. That is, the thread must be straight.
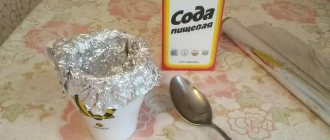
- Preparation for soldering. It is necessary to boil the solder and gold jewelry. Under the influence of high temperatures, gold will be covered with a special protective layer.
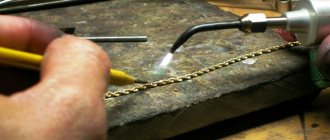
- Adjusting the flame and soldering itself. Before starting to create a seam, it is worth adjusting the burning intensity. Then heat the gold evenly at the joint. When the chain reaches the desired temperature at the break point, take solder and make a neat seam.
- Grinding and processing of the seam. If, after “gluing” the links, a large seam has formed that protrudes above the surface of the chain, it must be sanded. And then treat it with a special napkin to give the product shine.
Important! You not only need to understand how to solder a gold chain at home, but also be able to handle soldering equipment. And also for miniature products with small links, there is another, more subtle soldering technology.
Preparation
At the first stage, you need to prepare everything for soldering. You will need solder and flux. Flux is a mixture of chemicals whose purpose is to remove films of metal oxides from the surface before soldering to improve contact. Flux is also used to reduce surface tension, it improves solder flow and so on.
Each type of this substance has its own purpose, that is, a specific flux is also used for soldering gold. It can be purchased at a store dedicated to jewelers. It is very easy to use - you need to use a brush to apply it to the place that will be sealed before starting work. It will also remove remaining fat from the surface, and this will not need to be done additionally. To ensure uniform distribution over the working surface, the flux contains alcohol. In most cases, it heats up to 600–900 degrees.
Solder is even more necessary, since without it it will not be possible to join two torn surfaces. Solder is a metal, in this case gold, that is melted at a lower temperature than the base metal to fill the pores in the metal being fused. In order to lower the melting point of solder, impurities are added to it. It can also be purchased at a jewelry store. It is sold in small pieces or thin wire. There are several types:
- Solder with a high gold content and a small amount of impurities. It will hold more firmly, but it will initially need to be heated to a higher temperature. Such solder will have a purity of 14 carats and above. In addition, it can be medium-melting and refractory.
- Solder with a lower content of precious metal is easier to melt, but it will also hold up worse. The gold carat will be less than 14. Used for simple repairs.
There are solders with gold of different colors. But before using any of them for soldering, you need to familiarize yourself with the composition. It may contain cadmium, and you need to solder with it carefully, as it is toxic.
If you can’t buy solder, you can make it yourself. To do this you will need:
- crucible;
- copper;
- silver;
- gold;
- brass;
- burner;
- container for casting solder.
We place gold in the crucible, as well as silver and copper in the following proportions: 585:115:186. Jewelry requires high precision; it would be a good idea to use jewelry scales for measurements. It is best to use brass, but you can also use cadmium. Brass will need 135 parts, cadmium - 112. Using a gas burner, melt silver, gold and copper. Add the fourth ingredient to the melted mixture.
After completely mixing the ingredients, pour this composition into a container. When the metal has cooled a little, we shape it into a wire or plate using an anvil. After this, we put it away for storage, you can first roll it up.
Next, prepare the tools that will be needed for soldering:
- a gas burner, with the help of which gold will be soldered;
- vice;
- tweezers;
- awl;
- needle files or portable drill (engraver);
- pliers;
- sheet of refractory metal.
All tools must be small. You are unlikely to find them on the open market, but you can try going to a jewelry or watch repair shop to purchase them. You can also try looking for them at a flea market.
Cost and features of repairing gold chains in workshops
For those who have never worked with soldering equipment and do not know how to solder a gold chain at home, the easiest way out of a difficult situation with a breakdown is to contact a jewelry workshop.
The cost of repairing jewelry in a workshop depends on various factors:
- complexity and scale of the breakdown - one link in the chain or several;
- features of chain weaving - for example, a large anchor chain is faster and easier to solder than elegant women's weaving;
- urgency of work - you will always have to pay extra for speed;
- the need to add gold - the cost of 1 g of gold is about 1500 rubles. by the end of 2022.
The jeweler will tell you the exact price of the work when you bring your gold chain to the workshop for repair.
The recovery process itself includes several stages:
- Preparing jewelry for soldering. It is fixed on a stationary machine in the workshop. Clean the edges of the break so that no dust or dirt remains in the microcracks. Select the required solder composition.
- Soldering. Various tools are used depending on the type and degree of damage. Often special laser equipment is used, after working with which there are no visible seams on the chain.
- Seam cleaning and processing. The gold jewelry is returned to the client in perfect condition. To achieve shine, the seam is cleaned. Then the entire decoration is treated with a protective solution. It is this that increases the strength, reduces the abrasion rate of gold and gives the product shine.
Jewelers are much quicker at understanding how to solder a particular gold chain. After all, the craftsmen themselves are capable of making it from scratch. They take into account the features and direction of weaving. Specialists are even ready to apply engraving over the seam so that none of your friends and family will ever guess that the chain has been repaired.
Product preparation
Before jewelry soldering, the product should be secured in a vice or other suitable method. The damaged part of the decoration must be returned to its original shape.
You may have to tinker with this, but this is a mandatory procedure. This may require additional equipment. Selected cylindrical parts will help restore the original shape of a ring or chain link.
Such a part is inserted inside a deformed ring or chain link, after which the product is gently crimped from the outside with pliers until the desired result is achieved. Of course, the chain must be assembled, the damaged link or clasp connected to other links.
After the shape of the product is restored and it is securely fixed, the place of future soldering is cleaned, degreased and covered with a layer of flux. Flux creates a protective film on the surface of gold that prevents oxidation of the metal during the soldering process.
Now you can start the actual soldering. You can buy flux for soldering gold ready-made or make it yourself, taking 10 g of borax and boric acid per 100 g of distilled water.
The solution is boiled, and then the gold item is dipped into it and also boiled for several minutes. As a result, the gold is covered with a protective layer.