Woven bracelets look elegant and unusual. Handmade products are especially valued. They are distinguished by an exclusive design and indicate the good taste of the owner. There are different types of weaving gold bracelets and silver jewelry. They are divided according to the method of connecting the links, the degree of originality, style, and affiliation.
Men's weaving bracelets made of gold and silver are distinguished by their complexity, massiveness and reliability. Women's options are more sophisticated, but less durable. When paired with elegant chains, they look stylish and create an original ensemble and a memorable image.
To choose a piece of jewelry that meets the requirements, you need to know at least a little about the names of bracelet weaves. They were formed by jewelers who have been making such items for centuries. What are these names?
Features of weaving cord bracelets for beginners
Baubles from this material are made in plain and colored ones. Materials can be purchased at stores selling haberdashery, accessories and fabrics. There are leather, velvet, satin, nylon and twisted waxed threads. The founder of this type of needlework is the macrame weaving technique.
For those who have never created such bracelets, we advise you to start with the simplest models. They are no less attractive than complex weaving. Even a child can cope with them. Simple nodes are used in the work. Such as flat square or “Turkish head”. The work will take a minimum of time when using the most ordinary base, but the result will exceed expectations.
You can start learning from hand-twisted floss threads, and then purchase more practical materials.
MK double bracelet
*photo MK: Vera Mazepina
In the weaving of this bracelet, the beads are not fixed with a flat knot: in order to secure them to the base, you need to twist them alternately with working threads.
For this bracelet you need 18 turquoise beads with a diameter of 12 mm, 4 metal beads, waxed cord, scissors, glue and a lighter.
Types of cords
The materials used to create unique bracelets are ordinary laces, which can be purchased at any shoe, fabric or hardware store.
Needlewomen mainly use the following cords:
- Waxed lace is available in a variety of colors, so every craftswoman can choose the perfect color for herself. Such cords are quite durable due to cotton weaving, which is additionally coated with wax. Bracelets woven from waxed cords are practical and dense.
- The suede cord has a beautiful velvet surface. But, despite the elegant texture, such decorations are durable. Suede is also available in a wide color palette, among which you can find both classic colors and bright acidic shades. The only disadvantage of this material is that it rubs off quite quickly, forming bald areas, and the decoration loses its attractive appearance.
- Nylon cords are more often used to create beautiful knots for bracelets. The fact is that the ends of such laces can be easily singed, which means you can use absolutely any pattern and pattern without fear that the weave will unravel.
There are many patterns for weaving laces. Handmade bracelets will be a great gift for your best friend or boyfriend.
First, you should learn how to weave simple knots, and then you can start creating original designer jewelry using more complex patterns and techniques.
Historical information
They started making baubles back in ancient times. Previously, this was done by Indians living in North America. For them, these bracelets were very important because they were more special symbols than decoration.
They usually meant strong relationships between friends or lovers. If a person gave his best friend a bauble, then it was impossible to remove it from his hand until the thread broke by itself.
Removing such a bracelet from your wrist on your own was considered a strong insult. According to many people, such a gesture meant a quick break in friendship.
In the twentieth century, hippies began to weave baubles, which is why bracelets quickly spread throughout the world. Bracelets continued to be used as a sign of friendship and devotion. Best friends exchanged them, and lovers used them as wedding rings.
Closer to the present time, baubles have become more accessories that decorate a person’s appearance and image. However, exchanging them still symbolizes friendship.
Selection of schemes
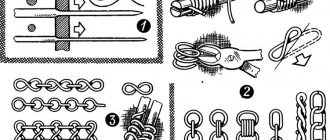
Below is a selection of patterns for weaving bracelets from laces.
1) The most common knot in woven bracelets is the double flat knot.
2) The next weaving option is “Tatting” knots with “picot” air loops along the weaving. Tatting knots are also called left and right loop knots.
Here the tatting knots are woven not on one knotted cord, but on two.
3) The Josephine knot (another name for the bow knot) is another way to weave a lovely bracelet.
Related article: DIY candle holder from a glass jar: ideas for Halloween
4) The Turkish knot or also called the “Turkish head” knot is very popular among lovers of bracelets with interesting patterns.
5) Weaving a variety of braids from 3, 4, 5 and 6 laces does not cause difficulties for beginning craftswomen.
6) A Celtic knot (“Heart” knot) can be woven for the entire bracelet and simply tied at the ends of the laces.
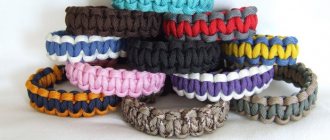
Myths about paracord
Survival in extreme conditions is always difficult for a person. It is difficult to live even for a couple of days without the usual benefits of civilization and the most necessary items. But there are people who like to consciously test themselves for strength, strengthening their character and fortitude.
First of all, physical endurance, unpretentiousness, ingenuity help them survive, and only then - improvised means. Paracord, used to equip parachutes, became precisely such a means.
The first to figure out how to use it were American paratroopers. It was they who came up with the idea to weave stylish, functional jewelry from durable rope.
The idea of making paracord bracelets belongs to American paratroopers.
The main feature of the accessory is that it is easy to tie and even easier to unravel if necessary. Soon, wearing such bracelets became completely justified.
Weaving such survival bracelets does not require special knowledge and skills. This useful decoration is easy to make yourself, with just a little practice. It can save lives in an unforeseen situation, and this does not necessarily mean survival in the forest. The bracelet will come in handy both when hiking, fishing, hunting, and in everyday life.
Have you ever made paracord bracelets? For what purpose? Share your experience in the comments.
How to weave bracelets from laces
Laces are an excellent material for weaving bracelets. These can be thick or thin laces, fabric and leather, laces of a wide variety of colors and textures. You can use as many laces as you like in one bracelet. A little tip: don't forget about the right color combinations and try not to overload the composition with ten different laces. Below in the photo you can see techniques that are perfect for beginners: Sometimes bracelets made of laces alone look rough, then they should be diluted with delicate and romantic beads: A bracelet made of leather will look stylish and fashionable. Just take some leather laces or ropes and make a simple but elegant braid:
Video
Cute bracelet made of metal and beads
You will need: beads on a cord, a metal base for a bracelet, a glue gun, thick thread, scissors.
Master Class
- Take the bracelet base.
- Apply glue to one quarter of the bracelet.
- Glue the beads onto the cord.
- Cover the entire bracelet with beads.
- Wait until completely dry.
- Tie a thread around the space between the beads.
How to weave a friendship bracelet with your own hands
A friendship bracelet, or in common parlance a bauble, is woven from thin threads. This is where you can absolutely not limit yourself in the number of colors; the more there are, the more colorful and pretty the bracelet will turn out to be. Weaving them is not so difficult, you can see some patterns in the photo below: We also recommend watching the video to see the process clearly:
These bracelets can be worn three or more at a time, they do not overload the image, especially if you choose the right color scheme.
Who invented baubles
The homeland of the “friendship bracelet” is the USA. Some Indian tribes had the same symbolic decorations. The Indians carefully selected the colors of threads and patterns for weaving, which they considered amulets that gave them strength, wisdom and the protection of spirits.
History claims that wickerwork existed in ancient China.
The Arabs, who invented macrame, also wove beautiful patterns. The passion for the macrame weaving technique is widespread throughout the world.
Nowadays, there are many woven products in the form of belts, necklaces, and all kinds of headbands. But the most popular decoration remains the bauble.
Models
Today there is a large assortment of stylish and unusual models on sale. Simple bracelets can be made not only from one cord, but also from several. They are often decorated with beads, nuts and pendants. The presence of decor adds charm, charm and romanticism to the products.
The model with beads looks beautiful and bright. You can use beads of different colors or the same color. This decoration is ideal for implementing a stylish look in an everyday style.
It is impossible to ignore bracelets with pendants. They look original and unusual. A wide variety of pendants allows you to choose elements for any theme. Decorations in a nautical style, such as pendants in the shape of an anchor or a steering wheel, look impressive.
Many girls choose a metal pendant with an infinity sign or an inscription, for example, “love”. Original pendants will help you create an unforgettable bracelet.
To create a strong and unusual model, it is enough to stock up not only with laces, but also with nuts. This decoration looks bright, massive and fashionable. A bracelet with nuts will add audacity and rebellion to your look.
Beginners in crafting can create a fashionable bracelet from a single cord. The weaving process does not require special skills or craftsmanship. Just take one lace and start weaving according to the pattern.
Professionals in weaving jewelry can use two cords at once. They can be presented in one or in different colors. A model of two laces will highlight the originality of the chosen ornament or pattern.
Bracelets made from flat cords are thin. An exquisite piece of jewelry can be worn to a special event or party.
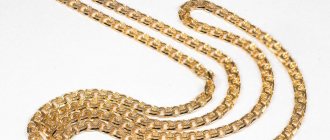
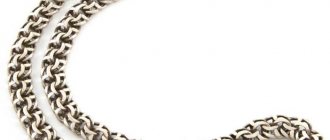
Armor weaving
In this technology, the links are located very close to each other. Armor weaving for women's bracelets made of gold and silver involves the use of small elements that form a straight line. Links located nearby create a figure eight. Men's jewelry is massive and resembles a flexible shell. These are reliable, flat, dense, but lightweight products that are made on special machines and are common.
The main types of armored (chain mail) weaving:
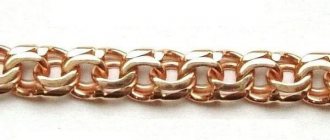
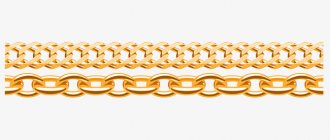
- Weaving Gurmet. The jewelry consists of one or two rows of links, which can be oval or diamond-shaped with beveled corners. There are bracelets with wide holes and with elements superimposed on each other.
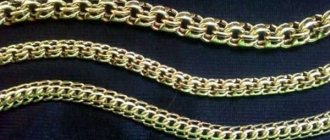
- Nonna weaving. Creates openwork bracelets that look sophisticated and luxurious. Nonna weaving for gold and silver bracelets is used quite often. It alternates large and small links connected into two tracks.
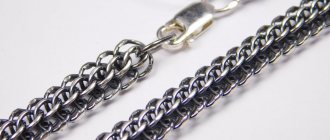
- Weaving Cobra or Snake. The links are connected so tightly that a smooth chain is obtained. It shimmers in the rays of light and resembles the body of a snake. The cross-section of the chain can be round, square, rectangular. A gold or silver armor bracelet of this kind requires careful handling. If bent too hard, it may break.
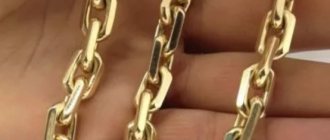
- Figaro weave. Series connection of round and oval links of different sizes in different quantities. The bracelets look respectable and unusual.
- Weaving Love. A light knit in which the links are twisted in the shape of hearts. Used in women's bracelets. Fits perfectly into a romantic image.
Love Weave
Weaving Nonna
- Snail weave. The ends of the links are twisted inward in a spiral. The result is a pattern similar to a snail shell or a paper clip.
- Weaving Singapore. Exquisite ligature with bright shine. It consists of two rows of chains with a complex structure, which are intertwined with each other.
- Braiding Braid. Three chains of small Cobra-type links are twisted so that a complex, very beautiful figure is obtained. Bracelets can be voluminous or flat.
- Rolex weave. The jewelry consists of thick large links of various shapes. The bracelets are reminiscent of those used in Rolex watches. Dense weaving makes the products strong and durable.
Snail Weave
Weaving Singapore
There are other variants of this technology, but they are much less common. In general, chain mail bracelet weaving is only slightly inferior in distribution to Bismarck and is considered to be of very high quality.
Cord Knots
Today there is a wide variety of bracelet weaving techniques. Craftswomen use different types of knots to create original and spectacular products.
Classic types of braiding include: four-cord braid, single and double puzzle, maiden braid and circular braid.
Even new weaving techniques are based on classic knots. Each needlewoman chooses a type of weaving that is convenient for her.
The bracelet made using the Turkish head knot looks impressive. It is woven around a cylinder that must fit the size of your wrist.
To complete the bracelet, you need to make a strong knot.
There are several types:
- Surgical - first you need to make one so-called “half-knot”. To create it, you should hold one end of the cord with one hand, and draw the other end around the first. Then create another half-knot. To secure, the lace is wrapped twice in the first half-knot, and once in the second. After this, the ends of the cord should be cut, leaving no more than one and a half centimeters.
- The usual way is to insert one end of the lace into the loop on the other side, then move the knot away from the loop and tie the ends together. But this option is impractical.
- Sliding is one of the most difficult options because it requires time and patience. It can be used to secure cotton cord.
To tie a lace, you need to leave a margin of 14 cm on each side. You need to create a loop from the right lace, and the tip should be on the outside edge. Take the left lace and circle the loop with it several times, then you need to create three more turns. After this, the two ends need to be pulled into a loop and tightened.
Next, we perform the procedure again to form another node, which will be passive. Then you need to make a loop at the second end of the lace - circle the free end five times and tighten it into a knot. You need to insert the remaining end into the resulting loop. The node is ready.
Decor for the finished bracelet
If you wish, you can add rhinestones, spikes or even metal chains to the finished product. Rhinestones can be attached to a thread, and then simply sewed into the desired part of the accessory, using a thread of the appropriate shade.
The spike is also easy to place. As a rule, they always have fastenings. Determine the places where you want to attach the spikes. Then take scissors and make small holes there. Insert the tenon screw into the holes made, then tighten everything with a screwdriver.
It is easy to attach a metal chain to the side of the jewelry. To do this, take threads that match the shades and simply sew the part to the bracelet.
You can also weave other decorated elements into the bauble, for example, beads, small metal nuts, etc. Use your imagination and imagination - then the product will turn out to be very original and beautiful.
Lace baubles: straight weave patterns
If you want to make a bracelet using straight weaving, take several laces of different colors as a basis.
Next, we fasten the ends of the laces and begin to make a series of knots to the right and left (we do this in one color). Then we weave another lace and repeat the knotted pattern the same number of times. As a result, you will get a beautiful product made from different colors.
In a word, stock up on plenty of laces, be patient, and don’t be afraid to experiment using a variety of lace bracelet weaves.
Tools you will need for the job
In addition to the paracord itself and the weaving pattern, you need to stock up on sharp scissors, matches or a lighter for burning the ends of the rope, a carabiner, an anchor or a fastex fastener.
Tools and materials needed for knitting an accessory
You will also need tweezers or a special needle for leather cords. It is a metal knitting needle with a sharp tip, and instead of the usual eye of a needle, there is a groove with a thread on it.
The end of the paracord needs to be slightly melted and inserted into the thread, and when it cools, it will be tightly fixed inside. After finishing the work, the needle can be easily removed without damaging the product.
Typically, bracelets are woven by hand, without the use of various devices. However, advanced craftsmen have come up with a special weaving machine that makes the work much easier.
Machine for weaving paracord bracelets
Find out the price on AliExpress
You can buy it at any craft store or make it yourself. The paracord is tightly attached to the loom, and the built-in ruler allows you to weave a product of the required size without additional measurements.
Master class on weaving a simple bracelet
To create a simple shamballa bracelet with your own hands you will need the following materials:
- 9-11 beads with a diameter of 8-12 mm;
- 2 beads with a diameter of 6-8 mm;
- nylon thread 30 cm long and 0.8 mm thick;
- two pieces of nylon thread 1.2 mm thick, 1 m and 60 cm long, respectively.
Before starting work, make sure that all beads can be strung on the selected thread. The work is carried out in stages, using a square knot.
Secure a 30 cm long thread to the pillow with a pin: this is our base. The meter thread is the working thread, we pass it under the warp so that 50 cm remains on each side, and tie the first flat knot.
Next, for reference: the working thread on the left is No. 1, on the right - No. 2.
Step 1. We draw thread No. 1 over the base. We pass No. 2 above No. 1 and under the base.
We draw No. 2 up to the left, into the loop of thread No. 1: it turns out that No. 2 passes under No. 1. Tighten.
Step 2: Now #1 is on the right and #2 is on the left. We draw No. 1 over the base. We pass No. 2 above No. 1, and under the base. We pass No. 2 up into the loop to the right of the warp thread.
We tighten it. The first square knot is ready.
Step 3. Using the same principle, we knit 4 more knots or more if you are planning a long bracelet. We move the bead to the last knot, tie another one, fixing it in one place.
Tips for choosing weaving material
Threads, cords and beads
First you need to choose the materials you will work with. Almost any thread is used to weave shambhala: floss skeins, threads for weaving fishing nets, ropes, knitting yarn and waxed cords are used.
In this case, you need to focus not only on the appearance of the selected material, but also on how it behaves in operation: for example, leather cords look very rich, but the knots on them are difficult to tighten. Thin cotton threads are easy to tie, but during use they quickly become unusable.
Most often, bracelets are woven from waxed cord . It is not as slippery as others, so the knots do not unravel during operation. The ends can be easily secured by burning them over the flame of a lighter. In contrast, cotton lace quickly loses its aesthetic appearance, and you also have to fasten its ends with glue.
When choosing beads, you need to focus on the width of the hole: it is important that it is large enough, so ordinary beads will not work - you will not be able to string them on a cord. Typically, one bracelet requires 5-7 beads, but there are examples of amazing designs that use just one bead.
You can order them in any online store, and if you have some time to spare, you can order the beads on Aliexpress.
Machine
Behind this term lies a very simple device that will help you quickly and easily weave a bracelet with your own hands. The weaving machine is a simple board into which two nails are driven at a distance of 25-30 cm.
To use the machine, you need to tie one end of the lace to a nail, and string the selected number of beads onto the free area. We also tie the second end to a free nail. In the end it should look like in our example.
Now you need to cut another thread, which you will use to make knots. We fix it on the one that is already on the machine, and you can work.
Even if you do not have the opportunity to make such a loom, you can learn how to weave shamballa at home without it. It is enough to secure the working thread in any convenient way, be it a pin or a stationery clip.
Advice from the experts
We also recommend taking note of tips from experts that will help you in your work:
- For a bracelet in one row, the length of which is 18.5 cm, you will need 12-15 beads. If you plan to decorate in two rows, then this amount is doubled.
- One bracelet will require a cord length of 1.5-2 meters. The exact length depends on both the circumference of the wrist and the number of beads used.
- To prevent the ends of the threads from becoming fluffy and interfering with your work, you can lightly singe them over a fire, or coat them with colorless varnish.
To get started, these tips are enough, and you will become familiar with the rest of the nuances as you work.
Paracord survival bracelet - description and how to weave a survival bracelet
Paracord bracelets, also called survival bracelets, are made from strong parachute cord. Paracord consists of numerous intertwined strands of nylon with a core. If you divide it into two parts, you can see that under the outer shell of intertwined threads, inside there is a light cable woven from several single cords, each of which consists of many interwoven fibers.
Why is a bracelet woven from paracord thread called a “survival bracelet”? The thing is that, if you get into an extreme situation, it easily unravels, turning into a strong rope, indispensable for many purposes. In addition, a paracord survival bracelet can be woven into a variety of necessary outdoor gear that can help out at the most necessary moment. Therefore, a paracord bracelet is an indispensable assistant for all tourists and extreme sports enthusiasts, which in everyday life looks like an original decoration.
The bracelet can be unwoven in a few seconds to be used for its intended purpose. There are many purposes for use:
- Medical care: rope and its fibers can be used as a hemostatic tourniquet, a splint for applying to a broken limb, dental floss, and can also be used to stitch wounds and make stretchers.
- Foraging for food. Paracord fibers are used as fishing line, bow string, making traps, hanging food or bait.
- Repair of clothes, tools. Used to sew up clothes, bandage shoes, tie up pants, and replace shoelaces. It is an indispensable thing when repairing equipment, bandaging parts of any structures, making handles for bags and other devices for transporting objects and things.
- Survival. It is used in the manufacture of weapons: rewinding handles, fixing the tip to an arrow or spear, and also as a bowstring in the manufacture of a crossbow for hunting. An indispensable thing when creating and securing parts of a shelter, tying the logs of a raft, making snowshoes, making fire. To start a fire, you can use flammable individual paracord fibers or use it as a bow string when starting fire by friction.
- Other purposes that can be achieved in everyday life: use as a cable for a car, a collar for animals, handcuffs, securing a load to a car, a sled, as well as paracord for drying clothes and as a rope ladder.
It should be taken into account that paracord is not used for dynamic loads, i.e. not suitable for any actions with the weight of a person (descent and ascent of a mountain, mountaineering, etc.).
Bracelet made from high-quality material To make a paracord bracelet with your own hands, you will need from 2 to 5 or more meters of this thread, depending on the width of the wrist circumference. As a rule, there are 1-2 meters of thread per 10 cm bracelet. In addition, you will need: a fastener, a lighter to burn the ends of the thread from unraveling, tweezers and scissors. In addition to a bracelet, paracord can be used to weave a watch strap, keychain, belt, and other accessories.
There are many patterns on how to weave a bracelet. Each of them has its own pros and cons, but the main requirement is one – the rope should easily unravel in a few seconds. With any weaving pattern, the survival bracelet should fit comfortably on the hand and have a flat shape.
How to make your own survival bracelet? You need to follow the instructions:
- The ends of the rope must be burned with fire to prevent unraveling.
- Four loops are made in the slot of the fastener.
- You need to make a loop from the long piece of paracord by pulling it through the first four.
- It extends about 5 cm, and tightens from right to left.
- Four loops need to be slightly loosened, then, using tweezers, pull out three more loops between each of them, leaving the fourth on the side.
- The loops need to be turned so that their left parts are in front.
- The cord is threaded through four loops, as in step 3.
- To complete the first row, you need to tighten the loops from right to left. Do not tighten them too tightly or twist them, this can ruin the appearance.
- Steps 3,4,5 should be repeated until the required bracelet length is reached.
- Once the desired length is reached, you need to pull the running cord through the last row. Its end should be on the right. You need to make gaps between the loops, and three more loops around the back of the fastener.
- You need to finish the weaving by pulling the end of the rope through the loop, then cauterize it or tie it in a knot. The last option is more convenient when untying.
To unravel the bracelet, you need to untie the knot, remove the clasps and pull the end of the paracord out of the outer four loops. If you pull the end, the bracelet will come loose.
Paracord diagram for a cobra bracelet
To weave a bracelet not only for the sake of a lace, you can expand its functionality and weave into it, for example, fishing accessories: fishing line, several hooks, sinkers. Weaving stages:
- The paracord is folded in half and attached to a clasp.
- From one end of the cord you need to remove 3-5 cm of internal fibers.
- The freed space inside the cord is filled with weights, 2-3 pieces are enough.
- The cut ends are joined together with glue, the protruding threads are singed with a lighter.
Another option is possible: attach the sinkers with tape or tape to the cord so as not to violate its integrity. But the appearance of the bracelet will suffer.
Fishhooks are simply glued to electrical tape, then wrapped around the bracelet.
- The required length of paracord is measured and secured with a clasp.
- The fishing line is wound around the paracord of the required length. You can also push it inside the cord if it is not too thick. Usually 6 meters of fishing line is enough.
- Next, around these two threads the main weaving begins, numerous visual examples of which can be found on the Internet.
Additional functionality of a paracord bracelet
As mentioned above, special additional accessories turn paracord bracelets into multifunctional jewelry. Inside, when weaving, various things necessary for the hike are placed. Both simple plastic carbines and flint and piercing and cutting objects can be used as a fastener.
Military tactical bracelets can often contain up to 10 different attachments.
Among them are:
- wrench;
- screwdriver;
- compass;
- can-opener;
- whistle;
- multitool;
- watch;
- thermometer.
Inside the bracelet there may be additional elements for survival in the wild.
In extreme conditions, it is important that the bracelet quickly unravels. When weaving correctly, only 10 seconds are enough to completely unwind the cord.
If you want to combine practicality in use with beauty and style, then you can use decorative elements in the form of a skull, anchor, or hammer as a clasp.
DIY men's bracelets: types and tips
Original jewelry is designed for daily wear and looks great both on vacation and in the office. Of course, you can always go to a jewelry store and choose a gift made of precious metal. But it’s much more interesting and enjoyable to make bracelets with your own hands.
Here are the types of accessories and recommendations for creating them:
- Leather men's bracelets.
Popular with young people and mature men. They are preferred by both athletes and people in business suits. Jewelry is created by weaving from thin strips or made from thick strips. Bracelets look stylish with the addition of accessories: metal anchors, rivets, beads.
- Decorations made from laces.
Manufacturing is cheaper than leather. Use waxed cords of any color. Black, gray, brown are suitable for everyday wear, bright acid colors are suitable for sports and recreation.
- Bracelets for men with beads.
The products look like rosaries and are made from plastic beads or ornamental stones. If a man spends most of his time in a suit, choose beads in black, gray, neutral colors. For a casual style, you can add additional accessories from other materials.
Be careful when choosing jewelry for bracelets. To ensure that a man likes the gift, decide on the style in advance and choose the appropriate materials. It can be elegant classic, casual, sporty or gothic.
Weaving methods
Jewelry making in the 21st century is based on the following methods of weaving gold chains and bracelets:
- Machine knitting is a complex automated process that is performed on special machines. Allows you to produce jewelry with ultra-thin links (wall thickness does not exceed 0.2 mm). But not all types of weaving can be done by machine knitting. For example, “Bismarck” is always hand-woven.
- Stamping is the weaving of jewelry from pre-prepared links - stamps. They are not soldered, but threaded one into the other. Stamped bracelets look massive and heavy, but in fact they are not strong and durable; they often become twisted and deformed when worn.
- Hand weaving is painstaking and delicate work. Jewelers who weave bracelets by hand are called chain makers. First, they wind a gold thread onto a base in the form of a spiral, then the resulting workpiece is cut into rings of the same size, from which the links are soldered. The resulting links are fastened together with pliers, weaving a pattern. A hand-knitted gold bracelet has a minimum weight of six grams, its appearance and quality depend on the skill of the chain maker.
After weaving, chains and bracelets are processed in two to four stages - diamond cutting, flattening, and beading.
The choice of jewelry is a matter of taste, but designers advise representatives of the fair sex with graceful wrists to choose gold bracelets made of fine weave. And massive ones, with many inserts and pendants, look better on a fuller hand.
Weaving from laces - patterns for beginners
There are many techniques. Creating original and spectacular jewelry, craftsmen use a variety of designs, simple and complex. At the same time, many original things can be obtained using only a few basic schemes. Therefore, for those who are trying to create jewelry for the first time, it is better to start with the simplest types. And they turn out no less attractive.
- Advice: it is better to first try weaving floss from twisted threads, and then start weaving knots from cords.
Options for securing threads during work
Before starting work, you should choose the method in which you will fasten the threads. You can take any of the existing ones, based on what items are at hand:
- Stationery clip. With its help, you can attach the ends of the threads to a book or other platform. The threads must be placed in the correct order for the pattern to be correct. They also need to be pressed well to the surface.
- Pin. The threads are tied in knots on one side and then placed on a pin in the correct strand. Then you can pin it onto the fabric and start working.
- Scotch. This option is the simplest - just attach the threads with a piece of tape to a flat surface, for example, on a table.
- A special tablet. You can make it from a flat board with a clamp on top. To make fixation more convenient, you can place a ruler in the middle of the threads and the clamp. There you can also place a diagram for work and other pieces of paper that you will need during the weaving process.
Schemes for weaving bracelets from laces: we analyze male and female options
Woven products, not only bracelets, but also belts for clothes, collars and cuffs, necklaces and headbands, scarves and stoles, bags and clutches, covers for phones and chair seats and much more, consist of knots, the tying technique of which can be easily found in such needlework as macrame. Macrame has its roots in Ancient Egypt, Greece, Iran, Peru and China. People of those times tied stone axes with similar knots and knitted mats. To this day, macrame is popular among both the female and male half of humanity. You will find patterns for weaving bracelets from laces below in the material.
Men, of course, do not wear jewelry, but they can wear a minimalist stylish bracelet made of knitted or leather cords. Women's jewelry is more varied and a woman has to have a large number of them in her wardrobe, matching them with each of her outfits, but in order not to spend your entire budget on beautiful things, you can weave an original bracelet yourself. For a woven bracelet, various materials are used: threads of different composition, incl. and floss, beads, satin and leather ribbons, fabric, knitted and leather laces, and to make the bracelet more attractive, it is recommended to add beads of different sizes and colors.
Selection of schemes
Below is a selection of patterns for weaving bracelets from laces.
1) The most common knot in woven bracelets is the double flat knot.
2) The next weaving option is “Tatting” knots with “picot” air loops along the weaving. Tatting knots are also called left and right loop knots.
Here the tatting knots are woven not on one knotted cord, but on two.
3) The Josephine knot (another name for the bow knot) is another way to weave a lovely bracelet.
4) The Turkish knot or also called the “Turkish head” knot is very popular among lovers of bracelets with interesting patterns.
5) Weaving a variety of braids from 3, 4, 5 and 6 laces does not cause difficulties for beginning craftswomen.
6) A Celtic knot (“Heart” knot) can be woven for the entire bracelet and simply tied at the ends of the laces.
Bracelet made of laces and beads
In the following example, you can consider step-by-step weaving of a bracelet from laces and beads.
You must first measure the size of your wrist with a centimeter and buy a cord 4 times longer than your wrist size, because... you need a reserve for knots, you will also need 9 large beads of different colors and 2 smaller beads for ties.
The color of the cord does not have to be black, the choice depends on desire.
The knot used to weave this bracelet is called a double flat knot.
First of all, you need to cut the cord into three cords of different lengths: one will be short, equal to the length of the wrist, an increase for the fit and size of the beads and bracelet ties; the other two are long, which will be used to weave knots and braid beads. Next, the cords are secured to the tablet or pillow with a pin, retreating a few (7-8) centimeters to the tie, and weaving begins. The laces should be arranged like this: two long ones along the edges of the short one.
1) The knots come first, you need to make 1 or 2 of them, double flat. You need to tie a knot like this: first the left single flat knot is woven, then the right single flat knot is woven underneath it, so you get a double flat knot, so that the knots look even and neat, you need to regularly tighten the short cord that goes inside the knot, so to speak, the base. The photo shows the sequence of weaving the knot:
2) Next, you need to put one large bead on the central lace, and the two outermost long laces wrap around the bead on the sides and again weave 1.5 double flat knots, one full double flat knot and one left or right single flat knot, depending on where was the beginning of the double knot. And again the bead is put on the central cord, and also tied.
3) Work continues in this way until all the beads are woven or until the desired length of the bracelet (wrist size) is reached.
4) At the ends of the bracelet ties, one small bead is placed on any cord on each side.
In order not to have to worry about tying a bracelet every time, you can weave a braid for ties with the same double flat knots. When putting on the bracelet, the ties move apart inside this braid and then tighten again to the size of the hand.
Bracelet with letters
Make your own bead bracelet by following simple steps.
Material:
- Threads of any color of your choice
- Beads with letters
- Buttons
- Scissors
- Thread fastening tape
Operating procedure:
- First, you need to measure the required length. Cut the lace to 4 times the length of your wrist. You will need 3 pieces of this length.
- Fold the thread in half and tie a knot at one end.
- Make the loop large enough to fit your button, but not too big that it can be easily undone.
- Glue the end of the rope to the table.
- Divide your string into 3 groups so you have 2 in each group. Start weaving a bracelet.
- Having reached a little less than half the way, you can string beads with letters. Children can also write their names or their friends' names on the bracelet.
- Before you start stringing beads, you need to tie a knot in the place where you stopped weaving. String the letter beads onto the two middle pieces of twine.
- When you're done, you'll need to tie another knot.
- Continue weaving until you reach your desired bracelet size.
- Thread 2 or more pieces of rope through the button. Buttons with 4 holes can be threaded a couple of times. Tie a knot at the back of the button and trim off any excess thread.
The design possibilities are endless with different colored threads, fun shaped buttons and different words. Each bracelet will be unique!
Main nodes
Each loop element in the diagram has its own place and designation. To understand it correctly, you need to master the types of nodes. The main ones are the right and left nodes. In these knots, the difference lies in the arrangement of the threads.
Their double combination will create the following type of nodes:
- Half. (left - right, right - left);
- Basic (left - left, right - right).
If you try to weave all these knots, you can quickly learn to read the patterns of weaving baubles and the result of your efforts will be a beautiful fabric.
Schemes for making beaded bracelets
Today we’ll talk about creating bracelets from beads and beads - hand, ankle, and also chokers that fit tightly to the neck, which, despite the rapidly changing fashion, are always relevant. A few tips before starting work:
- purchase all the necessary material at once, so that it does not turn out that there are not enough beads, but there are no such beads on sale;
- choose Japanese or Czech-made beads - although they are more expensive, they have beads of the same size, which makes the products smooth and neat;
- It is advisable for beginners to practice on cheap Chinese beads in order to acquire skills and get better at a rough draft, and only then weave masterpieces from expensive material;
- select beads, glass beads and other interesting blanks for the beads in case you want to change the pattern and diversify your product with inserts;
- do not forget about the base, which will require strong smooth threads (lavsan, nylon, polyester) or fishing line, as well as carabiners, clasps and special thin needles for needlework.
Making a fastener
Options:
- Braid clasp,
- Velcro,
- Button,
- Button.
The bracelet will become more elegant if it is decorated with fringe, beads, seed beads or rhinestones. Decorative elements can be sewn onto the finished decoration, as your imagination dictates.
There are many options for weaving this fashion accessory. Depending on the material used, you can make a triangular, spiral, round, flat shape.
A bauble given to a close friend or girlfriend with all your heart will forever remain a sign of great love and respect. Give such gifts to your friends as often as possible. This is a great way to express your feelings mentally.
The hippie youth movement has turned unique accessories into traditional wedding rings: young people in love enter into a marriage and present each other with the same wedding gift.
Weaving baubles is not only a passion and a hobby. This is a whole philosophy of art. The master puts into the bracelet his true concepts of love and friendship, music, etc., which in turn convey to others the character of his personality.