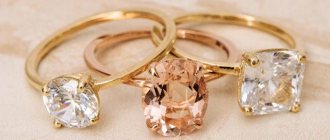
Making a wax model of the product
A lot of time passes before the finished jewelry appears before the eyes of the creator or customer. Based on the sketch of the future jewelry, the jewelry master first creates a wax model, from which the mold of the future jewelry is made. Previously, the craftsman had to cut the model out of wax manually. With the development of technology, it became possible to mechanize this procedure. Using a product made of wax, a casting mold is made. The wax is then melted away, leaving voids. Precious metal is already poured into the finished mold and, after solidification, the product is sent for final modification.
The process of creating a model from wax is called waxing. Thanks to the waxing technique, products are cast with the smallest details. Modern technologies make it possible to make geometrically complex patterns from jewelry modeling wax that cannot be made by hand. For this purpose, special machines are used that make it possible to replicate products and perform the finest work.
Composition and properties of jewelry wax
A special material is used for waxing. It comes in several types. The main properties that high-quality wax should have:
- sufficient strength after curing to withstand post-processing of small parts;
- must melt without residual ash during the mold annealing process;
- the surface of the model made from jewelry wax must be even and smooth and should not stick to the molding materials;
- the melting point should not exceed 100 °C, and the softening temperature should not be lower than 35 °C.
The base of jewelry wax includes natural or artificial material with the addition of chemical components necessary to change the mechanical properties. The composition of the wax affects the following properties:
- hardness and softness;
- viscosity;
- elasticity;
- mechanical memory;
- fluidity in molten form;
- interaction with molding materials;
- hardening speed;
- shrinkage;
- waste-free;
- melting temperature.
Depending on the purpose, the jeweler selects the necessary wax for the job. There may be cases when a master mixes several types, for example, fusing small parts from a material of greater hardness onto a rod of softer wax to model.
Once upon a time, another one of my cousins became interested in wax modeling, but she lived in another city and personally could not help her in any way in mastering this business. And I decided to do a wax modeling photo lesson for her. We spread the compass, for example, by 8 mm (8+8mm = 16 mm = size 16), draw a circle, spread it by 10 mm, draw the outer circle. We don’t rush, we don’t get nervous, you also need to be able to work with a compass.
Using any of these tools, we drill a hole for the file, about a millimeter from the inner circumference. You just have to be careful, we don’t even drill exactly perpendicular, but at an angle, so that the drill on the opposite side comes out a little closer to class=”aligncenter” width=”800″ height=”600″[/img] Feel the difference, our file is the lowest , the roughest - otherwise the file instantly becomes clogged with wax and does not cut. In general, there are special spiral files for wax, which make it even easier to work with.
I load the file into the jigsaw. I clamp the file on the side closest to me with a “lamb” (screw), thread the file into the drilled hole (“the drawing” should be at the top), resting my chest on the handle, I press to secure the file with tension. It must be taut like a string, otherwise it will break.
You need to cut it like this: the jigsaw should be held not exactly perpendicular, but at an angle. That is, from the “drawing” side the file goes along the line with a margin of 1 mm (for processing), and from the opposite side it goes a little closer to the center. This is done because when cutting, from the top, the progress of the file can be controlled visually, but on the other, the bottom side is not, and you can cut off the excess, so it’s better to be on the safe side, the excess can always be cut off and ground off. After the “donut hole” has been cut out, you need to trim the future inner side with a needle file.
You need to level it with a (rough) file perpendicularly (although in the photo the file is not perpendicular, the photo is not good). We don’t rush, we work carefully, otherwise one awkward movement and you can accidentally grind off what you don’t need; a coarse needle file cuts quickly. You also need to learn how to work with a file, and get better at it.
Next, cut out a piece of sandpaper approximately 4 by 5 cm and take one of the crossbars.
This is how we wrap the crossbar with sandpaper, put the workpiece on and carefully rotate it around the axis, leveling and grinding the inside of the ring. First one side, then turn it over and grind the second (the crossbar is under the cone).
By the way, the needle file and sandpaper must be periodically cleaned of adhered wax during work.
Now you need to cut the workpiece along the outer line. The jigsaw must again be held at an angle, but in the other, outer direction, that is, from the center. Ready. Now take a coarse file (for comparison, there is a fine-grained file nearby).
We process the outer side with a file. I didn’t photograph it very well, but you need to grind it in the same position of the wax relative to the file, only it’s held with both hands and you don’t grind it “lying down.” Explained as best I could)))
Grind it to look like this
Experimentally, trying on a compass from one side to the other, we find the center. Then with one
That's on the other side)
Most often, you get two closely spaced lines, with the middle between them. We draw the center along the entire circumference; it will be very useful to us as a guide for the next turning. Now you need to sharpen the edges with a coarse file and round them. It is best to hold the file as in the photo below, so it is easier to control.
First, we roughly grind down the corners, then more carefully give them a semicircular shape.
Now we take the workpiece in our left hand and hold it something like this:
On the right we take the same piece of coarse sandpaper, and it is best to hold it exactly as in the photo. Use your fingers to press the sandpaper onto your thumb and hand.
We process the blank, give a clear shape to the wedding ring
Now a little trick. We put a little kerosene (or aviation gasoline, something like that, the cleaner the better) into the syringe. We wet a small cotton cloth and thoroughly polish the ring. Kerosene dissolves the wax a little, thanks to this the wax is well polished, the main thing is that the cloth is damp all the time.
In this way, the wax can be polished to such an extent that you can see your reflection in it like in a mirror.
Then we treat the inner surface in the same way, and you're done. Not long before this lesson I made a “turban” ring in a similar way (pictured on the left)
To lighten the weight, I cut out all the excess inside, making the ring hollow
Afterwards, a sprue (wax rod) is soldered to the wax, and the model is cast. I’ll try to write about casting later.
Types of wax
There are two types of wax for jewelry: foundry and modeling. Modeling wax is more durable and is as hard as wood. It can be drilled, planed and sanded on a machine, even the smallest parts will be durable. Foundry wax is softer and more flexible; you don’t need a machine to work with it; you can cut out a shape with a minimal set of tools. Small parts made from such wax are more fragile; foundry wax is most often used for waxing. It is recommended that beginners start working with casting wax, as it is more plastic, pliable and melts faster.
Casting jewelry at home
Using a soldering iron, wax is applied to a metal finger of the required diameter for the ring. The finger is wrapped in foil for easier removal of the wax in the future.
Chisels are used for wax carving; Timofey’s are homemade. Wide and flat for removing large amounts of material and creating shapes, a needle for fine work and engraving, and a tubular spoon cutter for general work and wax fusing, which will be shown later.
When the drawing and letters are marked, the lines are gradually deepened and unnecessary fragments are removed from the background. And after an unknown amount of time, the model becomes similar to what you could see on the finger of the author of the channel AlexGyver. Then the iron finger is removed, as is the foil. Next comes the optional procedure of taking a cast from the model. The cast allows you to quickly make waxes and replicate the model, for example, for fans. But at the same time, even when making a single product, one wax gives one casting mold, and in order not to screw it up, you can also make a cast just in case, it will be saved in the game or program.
The model is filled with liquid rubber, for example, PentElast-718, which acts as an epoxy and vulcanizes when a catalyst is added. The mold for creating the impression is made of plasticine. To improve the transfer of small details, the wax is also carefully coated with rubber and then immersed in the mold. After curing, the cast is cleaned and everything is taken apart, the cast is cut.
It is not enough to just pour it, you need to completely remove all the bubbles from it, otherwise the molten metal will fill them and then the product will be covered with a bunch of small balls, which will not be possible to remove everywhere and the design on the model will be spoiled.
The pump pumps out air from under the hood, and the tabletop vibrates from a motor with an eccentric. This way all the bubbles are knocked out and blown out of the plaster. Gypsum is mixed over time because the process is strictly limited. Plaster is not just dirt that will dry out. When kneading, it is liquid and flows like kefir, but after 8-10 minutes it hardens, as a chemical reaction occurs in it. If you stir it further in this state, then it will remain porridge forever.