Shinka
The shinka is, in fact, the rim itself. Often this is the only thing a jewelry ring consists of, for example, if we are talking about a “classic” engagement ring. The outside of the bezel can have various treatments - smooth polishing, matting, texture, diamond cut, etc. It is always smooth on the inside. The ring size is the diameter of the tire, standard sizes are from 14 to 24 mm, one size is 0.5 mm.
The shank can be monolithic and seamless. These are obtained if the rings are made by casting or using the “pipe-cutting” technology. Another option is a soldered rim. This is how rings are made in small workshops, incl. at the now popular master classes. Soldered busbars are less reliable. The bezel can be made from one or more gold alloys. The second option is called combined, two-alloy, bicolor.
Tire width
Rim width is the distance from the top to the bottom edge of the ring. For wedding rings, it is the same throughout the entire circumference. Wedding models according to the width of the tire are usually divided into:
- narrow – up to 4 mm;
- average width – 4-6 mm;
- wide – wider than 6 mm.
Other types of rings, incl. engagement ones, usually have a variable shank width - it can increase towards the caste.
Tire thickness
Thickness parameters, as a rule, lie in the range of 0.8-3 mm. Like the width, the thickness of the rim can have variable dimensions, in which case the rim is called complex. It is often thinner on the sides, thicker towards the central part. This allows you to save precious metal, ensures wearing comfort, and can also be a design technique.
There are:
- full-bodied;
- thickened (thicker than 2 mm, these include, for example, “American” or “washer”);
- thin-walled;
- hollow inside.
White gold ring with diamonds 921324B
The reliability of the ring depends on the thickness of the tire. Gold can be rolled out into a very thin layer - think of the gold leaf on church domes. By choosing models with thin tires, you save, but lose in quality. Quite quickly they will bend and become deformed, which is especially unpleasant when it comes to wedding rings.
Bus section (profile)
The section of the ring is the cross-sectional shape of the rim, formed by the outer and inner walls. The outer wall can be round (“barrel”), rounded (“half-barrel”), slightly convex (“European”), or straight. The inside of the wall is most often straight, but it can be concave (economy option) or curved (comfortable fit).
size table
So, let's decide on the size. You need to understand that there is no single typology of jewelry sizes in the world - it’s something like with clothes and shoes. So when choosing an engagement ring, pay attention to the country of manufacture.
Here is a summary table with the sizes of wedding rings. Here are the parameters for engagement rings produced in different countries of the world:
| Finger circumference (mm) | Dimensions | Dimensions | Dimensions |
| Russia | Italy | USA | |
| 47-48 | 15 | 7 | 4 |
| 48-49 | 15,5 | 8,5 | 4,5 |
| 49-50 | 16 | 10 | 5 |
| 50-52 | 16,5 | 11-12 | 5,5-6 |
| 52-53 | 17 | 13,5 | 6,5 |
| 53-55 | 17,5 | 14,5 | 7 |
| 55-56 | 18 | 17 | 8 |
| 56-58 | 18,5 | 19 | 8,5 |
| 58-59 | 19 | 20 | 9 |
| 59-61 | 19,5 | 21 | 9,5 |
| 61-63 | 20 | 22 | 10 |
| 64-65 | 20,5 | 22,5 | 10,5 |
| 66-67 | 21 | 23 | 11,5 |
| 67-68 | 21,5 | 24 | 12 |
| 68-69 | 22 | 25 | 13 |
| 69-71 | 22,5 | 26 | 13 |
The table shows the most popular size ranges in Russia, but the list is far from exhaustive. For example, Japan, Switzerland, and France have their own numerical classification. And in the UK, letter size designations are completely accepted!
The easiest to understand is the Russian size range, which, by the way, is also relevant for some European countries (for example, Germany). It is based on a single SI table and simple measurements.
We take the circumference of the ring on the inside in millimeters, divide by Pi (a mathematical constant equal to approximately 3.14) and get the diameter. This will be the ring size in the Russian system.
The basic formula is as follows: D (diameter) = l (circumference, finger circumference): 3.14.
Everything is extremely simple: you just need to accurately determine the diameter of the finger and make basic calculations. Other countries have adopted much more complex formulas, so don’t bother with math: it’s better to just find out the girth of your finger and correlate the value with the table above.
As you can see, ring size 15 is the smallest, but even this is rare in mass retail chains. Typically, small size wedding rings have to be made to order in jewelry workshops. Of course, this is an extra expense and hassle, but you can choose a truly exclusive model that will highlight your individuality. The same applies to large size rings (over 22 according to the Russian system).
For a fragile girl, you should choose about size 16, for a lady of average build - size 17 or a little larger. But this is by no means a dogma: rough estimates cannot replace accurate measurements.
The most popular are men's wedding bands in sizes 18.5-20.5. You need to look hard for bigger rings. Or make it to order, as mentioned above.
Top
The shank is the lower part of the ring; accordingly, the top can rise above it. It consists of a caste - a frame for a precious stone or a metal decorative element, a bezel and an overlay. All components of the ring, its tops, are attached to the rim.
White gold ring with diamonds and sapphires 921485C
This leopard ring in gold with diamonds and emeralds is made to order
Cast
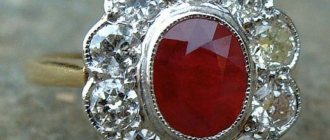
Caste is the place where the stone is attached, its setting. The style of the product depends on which caste is chosen for insertion. The setting determines the supply of the stone. A properly selected caste can maximize the beauty of a crystal, as well as hide its shortcomings.
There are many casting options. The most common:
- prongs - metal legs that hold the stone;
- blind caste - a metal cup into which an opaque insert is placed;
- rim frame - a blind caste with a through bottom for transparent stones;
- corner setting - fastening stones with gold columns or balls on a shredder, pavé - its variety;
- channel - the inserts are removed into the channel on the shredder and held in place by a “rail”.
The cast not only holds the insert, but also protects it from mechanical stress. Thus, precious stones in a prong setting are the most vulnerable, while it is precisely this setting that allows you to see a diamond or ruby in all its beauty.
Welt (digel)
A welt is a contour rim, a connecting element with which the caste is attached to the shank. It copies the contours of the cast and does not go beyond its limits. The welt can perform a purely technical function or be, incl. and a decorative element of the product. It can be high, low, straight, conical. If there is a bulge on the bottom of the welt, it can be called a digel.
This red gold ring with a scattering of diamonds in the shape of a ball is made to order
The importance of making the right choice
In this case, it is not the design that is of fundamental importance, but the size of the wedding ring. The appearance of the “complicated decoration” is just a matter of taste with an eye on fleeting fashion, but the metric parameters of the engagement ring are a matter of your comfort and health.
If you buy a ring “to grow,” there are high chances that it may simply not survive until it grows, that is, it may get lost. You can, of course, “support” it with another ring, but this is not the best option.
Gold wedding ring (go to the SUNLIGHT catalogue)
A wedding band that fits too tightly on your finger is not only a physical discomfort, but also a problem with blood circulation. Can you imagine what will happen to your finger on a hot day, on the beach or in the gym? Of course, at such moments it is better to remove any rings, but if the engagement ring is too small, any manipulation with it turns into torture.
The engagement ring should be exactly the right size, no more and no less! So let's get down to figuring out your anthropometric data and correlating it with the size range of wedding rings.
Insert
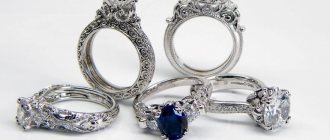
We have already found out what the parts of a ring with a stone are called. Well, any stones in a ring are called inserts. They are not always attached to the top; they can be used to decorate all the main parts of the ring. Often, a piece of jewelry can be distinguished by a central stone and auxiliary inserts, which are needed to enhance the brilliance of the soloist.
Inserts can be:
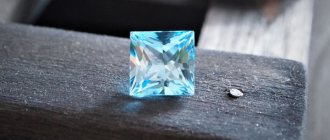
- transparent stones, for example, diamonds, rubies, emeralds, sapphires, topazes;
- opaque stones - opals, pearls, mother-of-pearl;
- cameos and gems are carved stones.
When buying a really expensive high-carat crystal, first the same diamond, emerald or sapphire is selected, and then a frame is selected for it that can highlight all its advantages.
As we managed to find out, the ring consists of parts. The skill of the jeweler-assembler is to connect them firmly and beautifully, as well as securely fasten the inserts. “Diva” employs masters with golden hands! We guarantee that our jewelry will last for many years and become your family's heirlooms!
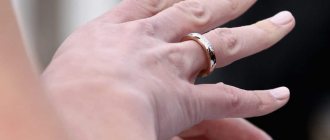
How to determine the size of a wedding ring at home
The easiest way is to take measurements directly in the store: there you will definitely get the color right. The seller will probably have special devices in his arsenal that allow him to determine the size of rings with an accuracy of up to a millimeter.
But if you decide to use the services of an online store, you will have to find out the size of the wedding ring at home. Treat this process carefully: even a couple of millimeters matter. It is also necessary to take into account the fact that the finger in the middle of the phalanx may be thinner than at the joint (this is very typical for people of asthenic physique).
Let's look at the simplest ways to help determine the size of a wedding ring for a man or woman on the eve of the wedding (or after it).
Gold wedding ring (go to the SUNLIGHT catalogue)
According to the finished ring
The easiest way to choose the right size of a wedding ring for a woman or a man is if you already have a similar piece of jewelry in stock. Ideally, this should be as simple a ring as possible, optimally suited in size.
Let's look at the first option:
- We place the ring on thick paper and arm ourselves with a pen with a thin rod (preferably a capillary).
- Press the ring onto the paper and carefully trace it around the inner circumference.
- Apply a ruler to the diameter and look at the value - this will be the desired diameter.
To implement the above method, only a ring without elements protruding from below or from above is suitable. A signet or ring with a large stone will definitely not provide the required data accuracy.
If you don't have a smooth ring in your arsenal, you can try an alternative option.
- We look for dimensional stencils on the Internet (like coins) and print them on a printer in accordance with the actual size.
- Carefully cut out the size circles with nail scissors.
- We try on the existing ring until the size matches.
An alternative option is to create dimensional circles yourself, using a good engineering compass.
Using a strip of paper
You can also determine the girth of your finger using a strip of paper. It is best to use drawing paper: it is denser than regular writing paper, but softer than cardboard, so it makes it possible to take measurements as accurately as possible.
We proceed like this:
- Cut a strip of paper (length - about 5 cm, width - 1-1.5 cm).
- We wrap it around the lower phalanx of the ring finger (including the bone).
- Mark the joint with a pen or felt-tip pen.
- We unfold the tape, apply it to the ruler, make measurements and calculations.
A similar option using a template in the form of a ribbon is also very good. You just need to print it on a printer at a scale of 1:1, cut it out and measure your finger. Don't have a printer? It is easy to construct such a template by hand using a pencil and ruler.
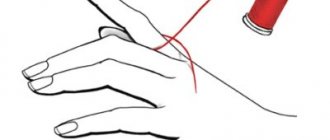
Thread
For our purposes, a thick thread, rope or braid is suitable. It is fundamentally important that the measuring thread is strong and does not stretch, that is, it maintains its original length during all manipulations.
It's simple: we tie a thread around the finger in the area of the thickest joint, firmly fasten the knot, cut the thread right next to the knot, apply it to a ruler and measure the distance from the free tip to the knot. Finally, we apply the basic formula and get the size of the wedding ring.
This method is very difficult to implement alone. Ask your future spouse or someone close to you for help, otherwise the measurements will be fraught with large errors.
Available measuring tools
If you have a tailor's measuring tape in your home arsenal (it is often called a “centimeter” in everyday life), there is no need to bother with paper tapes and threads. Simply wrap a tape measure around your finger in the desired location, make a mark, and apply the basic formula.
An alternative option is to use a caliper. This tool is unlikely to be found in a woman’s household, but a skilled man probably has it.
When measuring a finger with a caliper, you will immediately get the diameter, that is, the size of the ring, so no additional mathematical steps are required. The main thing is to measure your finger along the joint and not pinch it too much.
We take out the finished base
Now all that remains is to wait for the mold with the metal to cool and harden.
The master, under the pressure of water, removes the remaining clay from the frozen metal and gets the same jewelry “Christmas tree” as in the first stage - only that “Christmas tree” was made of wax, and this one is metal. The rings strung on the rod are removed using scissors-nippers.
Forming a ring model
When the designer has decided on the appearance of the ring, and the technologist has given the go-ahead to cast the jewelry in metal, the next stage is creating a prototype of the future product.
For this, rubber molds are used that are filled with wax (“waxes”), or a modern, but more expensive, 3D printing method. It allows craftsmen to see what the ring will look like after production and, if necessary, adjust its parameters.
After final approval of the model, the master recreates an exact copy of the ring, which will serve as a cast for casting.
5. Filling
At this stage, the prepared mold is filled with metal. This can be an alloy of pure gold, or alloys (base additives) that affect the color and purity of the metal. For example, copper gives a reddish tint to gold, copper + silver gives a yellow tint, and palladium + platinum gives a white tint.
Typically, alloys are added in equal proportions. When melted, they are thoroughly mixed and poured into the blanks, filling all the “Christmas tree” voids.
This is a very important stage of work, since the master must achieve complete homogeneity of the alloy.
Ring manufacturing technologies
Today, the four most common technologies for making gold rings are:
- Casting;
- Pipe-cutting;
- Soldering;
- Stamping.
Casting is used in the entire line of jewelry: from creating rings to earrings, bracelets and pendants. This method allows you to recreate jewelry of varying degrees of complexity in metal with high precision in every detail.
Each individual piece of jewelry is cast in wax, which guarantees the originality and quality of the jewelry.
Creating a Sketch
First, the master thinks about how the product will look and projects it on paper from different angles. The designer creates a layout of the future ring taking into account the chosen decor. The main thing here is to find a balance between the artist’s creative impulse and the possibilities of its implementation in reality. This is already being done by a jeweler-technologist who assesses the feasibility of a specific idea in metal.
The technologist approves the sketch or sees which of its elements should be changed/simplified. For example, if a piece of jewelry is too intricate in shape, it might make sense to break it down into pieces and make each one separately.
Small but accurate adjustments to the design will always benefit the future product, helping to improve its shape and comfort to wear.
Finishing
This is the so-called “beauty-making” stage. To give the rings a presentable appearance that will captivate displays, they are sanded and polished.
Sanding and polishing are not the same thing. First, the master polishes the product, that is, he removes rough marks from the initial processing and evens out the texture of the ring. Then comes the time for final polishing: the product is given a beautiful glossy shine.
When and how is it best to take measurements?
It must be remembered that the thickness of the fingers is not a constant value: it can fluctuate by a size and a half even during the day.
It is not recommended to take measurements:
- when you are sick (fever);
- in the morning or evening;
- in hot weather;
- after training or going to the sauna;
- if you drank a lot of water.
Ideal time for measurements: midday, normal mood and condition, peace, coolness, not drinking too much liquid.
The most difficult thing is to choose a ring if the bride is in an interesting position. In the first or second trimester of pregnancy, almost everyone’s fingers swell. The most reasonable option is to choose a comfortable and inexpensive model, and after giving birth and returning to normal physical shape, replace it with something more presentable in accordance with the current size.
If you chose an engagement ring earlier, but during pregnancy it became too small, it is better to simply take it off. Changing ring sizes back and forth is not only wasteful, but also not always possible. If you want to emphasize your married status, during pregnancy, take something inexpensive, but in size.