When children are born into a family, parents begin to realize how little they know about this world. Why is the faucet beeping? How does a plane fly? Why is the sun yellow? You will have to prepare answers to all these questions. But the young researcher will not stop there. He needs to see exactly how certain processes occur. How ice freezes, how snowflakes form, how crystals grow. Satisfy your young know-it-all and make sugar crystals with him.
Visiting Santa Claus
This is exactly what this adventure could be called. Sugar crystals most closely resemble oddly shaped ice icicles. If it’s summer outside and the children are missing the wonders of winter, then it’s time to invite them to create a delicious miracle together. The sugar crystals turn out very beautiful. Sparkling with many facets, they attract those with a sweet tooth. And of course, they are very tasty.
And making them is not at all difficult, but it takes a long time. Preparation will take about 20 minutes in the evening and the same in the morning. And then every day the children will run ahead of each other to see how much their crystals have grown. Invite them to keep a diary of observations, let them take photographs and take measurements. They will feel like real testers.
How to grow a colored crystal
If growing crystals from food has already been successfully mastered, you can aim for a homemade ruby. Of course, it will not be real, but no less attractive and bright. The chemical substance potassium hexacyanoferrate(III), which is popularly called red blood salt, will help you obtain such a pebble. You can buy the substance without any problems in an online store or a store selling goods for the chemical industry. The crystal grows for about three weeks. At your discretion, you can grow a single crystal or a garden of many small crystals.
No age restrictions
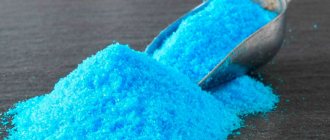
The older the child gets, the more difficult he wants to do experiments. Therefore, edible snowflakes are of interest mainly to younger schoolchildren. Give the elders something more complicated, like experiments with bright blue crystals of copper sulfate. But usually they, after grumbling a little, begin to watch the growth of snowflakes with curiosity. Preschoolers will also be very happy to join in the observations. But the most important thing is that even if a child accidentally breaks the jar, nothing bad will happen. Well, you won’t get sugar crystals on a stick.
By the way, if it doesn’t work out the first time, then you shouldn’t despair. You can try again, because the sugar syrup is already ready anyway. In addition, it can be used to make jam.
Recommendations
True, there are not only rules of conduct regarding the procedure, but also several tips. They will help you achieve maximum and good results. What are we talking about?
For example, do not remove the crystal from the solution unless necessary. Otherwise, the crystallization process will be interrupted. And, of course, the experiment will fail. In order to look at your work, you can use transparent containers - through them you will watch how the crystal grows.
Make sure that no debris or other impurities get into the concentrated solution. If there are any, try to carefully remove them. Did not work out? Then leave everything as it is. Just do not “disturb” the suspended crystal or the rope lowered into the solution. This will also harm the process.
For best results, always use distilled water. It has already been cleared of impurities and salts. And this means that your solution will be as concentrated and high quality as possible.
What will you need?
If you are interested in how to make sugar crystals, then let's move on to the necessary products and equipment. For the first time, you can get by with 3-4 pieces. If the kids really like the idea, then they can repeat the sweet miracle in double size. So, you need to prepare:
- Sugar - 5 cups + 4 tablespoons.
- Water - 2 cups and another 3 tablespoons.
- Bamboo skewers - 4 pieces.
- Transparent glasses.
- A saucepan for boiling syrup.
- Cardboard for securing the skewer in the glass.
- Dyes optional.
Preparatory stage
The first step is to prepare the ground for crystal growth. They will not cling to a smooth stick; they need a substrate. To do this, cook a little sugar syrup from just 2 tablespoons of sugar and 3 tablespoons of water. Stir until the grains dissolve, then carefully brush the skewers with syrup. Not completely, but only to the length over which the growth of the icicle will extend. Scatter two more tablespoons of sugar on a sheet of paper and carefully roll our skewers in it. It is important that the grains adhere evenly over the entire surface. They will be the basis on which the crystals will grow.
That's it, leave it to dry until the morning. This is also an important point, because if you immediately dip the sticks into the syrup, the sugar stuck to them will immediately melt. And it must be preserved as the backbone of the building.
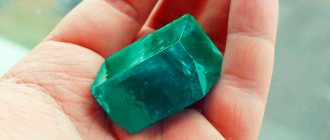
How to grow a crystal from citric acid
To grow a crystal you will need about 180 g of citric acid for every 100 g of water. Let us immediately make a reservation that the process is more complex than in the case of using salt or sugar.
Growing process:
- In water (100 ml) at a temperature of 20⁰C, dissolve citric acid (130 g). During operation, the container with the solution will need to be slightly warmed up so that the temperature is stably maintained at 20⁰C. To do this, you can use another container with hot water into which you can immerse a glass of citric acid. It is advisable to monitor the process using a thermometer.
- Then, over the course of a week, you need to add citric acid until it stops dissolving. For this, the remaining 50 g of citric acid will be enough for you. The solution will become like thick jelly, and small crystals will appear at the bottom.
- At this stage, strain the solution. Wrap one crystal with fishing line and immerse it in the seed solution.
- After 7-10 days, the crystal will reach 10-12 cm in diameter. You can pull it out, dry it and varnish it, or continue growing it.
The citric acid crystal is very sensitive to temperature changes and can crack, so it needs to be grown in stable climatic conditions.
We continue to work
In the morning our sticks have dried well, we can continue working. So quickly write down how to grow sugar crystals.
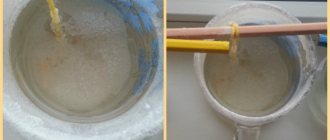
- Pour water into a saucepan and place on fire.
- Add half the sugar and heat until dissolved, stirring.
- Now comes the time for the rest of the sugar. And also do not forget to stir until completely dissolved.
The rich syrup is ready. Let it sit for 15 minutes and cool slightly. Schoolchildren can also master sugar crystal recipes; there is nothing complicated here. In the meantime, you need to prepare skewers on which magic icicles will grow. To do this, you need to cut out pieces from thick cardboard, slightly larger in diameter than the prepared glasses. You need to insert prepared skewers into these pieces.
What are these cardboards for? They have two tasks. They prevent future crystals from coming into contact with the walls and bottom of the glass and growing to them, and also protect the solution from dust. And the final touch. You need to pour hot syrup into glasses and place skewers in them.
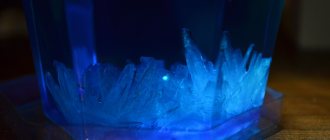
Photo of how to grow crystals
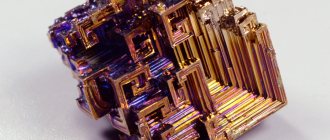
Crystals, regardless of whether they are natural or artificial, amaze with their beauty, versatility and unusualness. This is why interest in growing crystals at home is increasing. They are grown in the most unusual shapes and colors, using simple ingredients such as salt, soda, citric acid, dyes, etc.
You can grow the most beautiful and unique crystal for yourself using different methods, choosing the one you like best. There are even special kits on sale for fans of home experiments, with the help of which it is possible to obtain crystals of simply incredible shapes.
Here are the photos of finished crystals that amateur chemists post online:
Dyes and flavorings
Sugar crystals made at home can be different. Instead of water, use cherry syrup from homemade compote - and the taste will be completely different. But then you will not be able to observe the growth of crystals through the walls of the glass. Of course, they can be raised above the surface and lowered back.
But most often a small amount of food coloring is used. It must first be dissolved in water. You will need powder on the tip of a knife per glass. Dissolve this amount in a tablespoon of water, then mix with syrup. But when adding dye, the solution turns out to be less saturated and the crystals grow slightly smaller. Of course, this is not critical, but many agree that transparent icicles are the most interesting.
How to grow a crystal from salt quickly
Crystals grow beautifully from salt, but most recipes suggest using plain table salt. It is, of course, suitable, but if you are not very patient or you need the crystal as soon as possible, we advise you to use sea salt. It will not only speed up the rate of formation of the crystal array, but also make it much stronger. But, no matter what kind of salt you take, the appearance of the crystal will remain the same - it will be large, white, slightly transparent and, of course, will resemble a strangely shaped salt.
Let's start growing a salt crystal:
- Take boiled spring or filtered water and pour it into a glass jar.
- Stir a lot of sea salt into it, and when its crystals refuse to dissolve, strain the solution through cheesecloth.
- Pour the solution back into the jar, select a large crystal of salt, tie a thread to it and lower it into the solution. Then cool the solution quickly (this will speed up the formation of small crystals on the base).
- Wait from a week to a month depending on the size of the crystal you need.
- Wipe it dry with a napkin and treat it if desired.
Observation
That's it, nothing more is required from you. Just check how the growth is going. Believe me, it's very interesting. The very next day you can notice that everything is working out. The first days are best observed and photographed through glass. But after a week, you can calmly lift the stick, examine the forming edges, and lower it back into the solution. It will take at least 14 days for the crystal to be effective. Now you can get your personal crystals, the fruits of labor and many days of waiting. Take a photo, then you can eat them like regular candies, which they are. Children claim that they turn out much tastier than store-bought sucking candies. This is not surprising, because they themselves created this miracle.
Difference from regular sugar
Natural sugars can be found in fruits, vegetables and milk. They are complex carbohydrates that provide nutrition and help regulate blood sugar levels. When sugar enters the human body through fruits, then we can only talk about beneficial properties, since the person will receive a dose of cholesterol. Refined white and brown sugar (sucrose), honey and syrups added to food are the focus of all health research. These added sugars are simple carbohydrates that provide little nutritional value and can cause spikes in blood glucose levels.
Yandex Pictures
Regular sugar is very harmful because it contains a lot of calories.
If a person who is diabetic or has high levels of fat in the blood consumes this sweet in large quantities, then the level of blood sugar and triglycerides will increase significantly, which is a risk factor for heart disease.
The bottom line is that sugar does one of two things. This either displaces more nutritious foods in the diet or adds calories. This puts you at risk of weight gain. There are several problems associated with excess sugar. It promotes tooth decay. Foods high in sugar are not nutritious enough. Eating a lot of sweets means that your diet is incorrect. Excessive consumption can cause obesity and weight gain because it replaces nutrient-dense foods with empty calories. Weight gain is associated with a high risk of heart disease, diabetes and some types of cancer.
Sugar, no matter where it comes from, tends to raise triglyceride or fat levels in the blood, and higher triglyceride levels increase the risk of heart disease. It all comes back to heart disease.
Sucrose, glucose and fructose are important carbohydrates that are commonly referred to as simple sugars. You can't tell the difference between sucrose, fructose and glucose with your tongue, but your body can sense the differences. They all provide energy in equal quantities, but are processed and used by the body for different purposes. Glucose and fructose are monosaccharides (one unit of sugar) and are found in sucrose. Glucose, released after digestion of carbohydrates from food, is used for energy or, in case of excess, stored in the liver in the form of glycogen as an energy reserve. The hormone insulin begins to be actively released in the body if glucose levels are very high. Thanks to insulin, glucose can easily enter the cells. People who suffer from a deficiency of insulin in the body often have insufficient glucose levels. Fructose is naturally found in fruits and vegetables. Fructose is metabolized in the liver and does not require insulin to metabolize it, which is why fruit (a source of fructose) is often recommended for diabetics. It is necessary to control the total content of carbohydrates and fats in the diet and maintain a healthy body weight. Sucrose, or table sugar, is obtained from sugar cane or sugar beets. Sucrose undergoes metabolism and is divided into individual sugars: glucose and fructose. Glucose is the body's preferred source of energy, and excess energy from fructose, if not needed, will be used for fat synthesis.
Consequently, navat and regular sugar have both differences and similarities. They are high in calories. They should not be consumed in large quantities because it can lead to serious health problems.
The differences lie in the unusual form, methods of use and composition, since navat contains fructose and glucose, which are more easily absorbed by the body.
If the result is not visible
People who are trying to grow icicles for the first time periodically encounter this. The syrup is poured in, the skewers are immersed, but nothing grows on them. And usually, after a week of painful waiting, the syrup is sent to something else, and the idea is considered a failure. In fact, it is possible that the room is simply too cold. Under such conditions, the crystal will grow very slowly, but stunning, cubic faces will form.
Temperature changes can also affect growth. Try to keep them to a minimum. And another very common mistake is that when skewers are dipped into syrup, it should be slightly warm. Not cold, but not hot either. These points need to be taken into account so that everything turns out just perfect. Surprisingly, adults make such sweets for children, but they themselves usually rush to check the contents of the glasses in the morning even faster than children. That is, the activity is very exciting. And for the New Year holidays you can make such crystals for all family members. An original handmade gift.
Instructions on how to grow crystals
Growing home crystals is a simple and exciting process if you study the rules of the experiment in advance and prepare the necessary materials. The only negative is that the crystal takes quite a long time to grow, on average it takes at least a month.
The formation of the crystal lattice, the rate of its growth, color, density - all this depends on the quality of the prepared solution, the selected dishes, and the humidity of the external environment. These details must be taken responsibly. But the first thing you need to start with is the selection of equipment.
To grow a beautiful crystal you need:
- Container for crystal. This is a kind of incubator that must comply with the rules: it should not oxidize, give off color, or deplete the smell. The best option is glass or enamel dishes. We immediately exclude metal, clay, and plastic vessels. As for size, there are no restrictions: it matters what size crystal you need.
- Stick for stirring the solution. Here again the emphasis is on the material - we choose wood or glass.
- Paper. During the growing process you will need good quality white cloths or filter paper.
- The main component for the solution. It could be table salt, sugar, soda or something else. You select this product in accordance with the selected recipe.
Although solutions from different substances are used to grow crystals, the essence of the process itself is almost identical in all recipes.
The basic growing algorithm is as follows:
- The salt or other ingredient is dissolved in hot water to form a concentrated solution.
- The seed base for the crystal (this can be a large piece of salt) is washed in water and immersed in the prepared solution.
- The container with the solution is tightly closed. After about 24 hours, remove the lid. Around 3-4 weeks a large crystal will already be noticeable.
- As soon as the top of the crystal emerges to the surface of the solution, the liquid is drained and the crystal is carefully removed from the container.
- Then the crystal is dried and kept in a place protected from water and its beauty is admired.